Disclosure: This post contains affiliate links. If you purchase through these links, I may earn a commission at no extra cost to you.
I started this project out because our little one is starting transitional kindergarten soon and it’s been hard to keep everyone in the loop. For starters, we have an extended family so we coordinate with aunties, uncles, and grandparents on our son’s day-to-day. It was already hard enough to remind everyone when his doctor check-up appointments was scheduled or his dentist appointments or his eye doctor appointment. Then there’s all of the days we were taking him out and the family wanted to join in. I can only imagine how hard it would be to coordinate when he starts having days where he needs family to drop him off and pick him up from school. Then, we’ll also have school plays, fundraisers, open-house, field trips, and sick day pick-up to coordinate. Our heads were spinning just thinking of trying to coordinate that on chat or email. I’ve already experienced the headache of coordinating a birthday party that changed location and time a few times. It was hard to inform everyone of these on-going changes that it became a back-and-forth nightmare. And, with each change of date or time or location, it was the same process over again. At the end, you think everyone got the memo but you start getting last minute text about someone coming at an old date/time and having to remind them again.
Let’s make our own solution and make it a family project!
My solution came to me when I was laying down between half-built Lego buildings and his scatter rock collection (OK, they’re minerals for accuracy) at 3 AM trying to get him to sleep. I had a vision. A solution for the chaos of scheduling. After, a back-and-forth with family about a event in the future on our group chat, I knew we could do it in a better way. You know, when you’ve had to re-paste the “new” new time for the event that one or two family members missed in the chat and you didn’t want them to arrive at the wrong time and date (and you know one or two family members will arrive at the wrong time anyway). A smart calendar that everyone can see in the living room as well as contribute and edit on their smartphones. That was it. A digital hub and display to get everyone on the same page.
This was something feasible since I’ve been learning Python for the past five years and had been tinkering with Raspberry Pi single boards (e.g., mostly Pi 3, Pi 4, and Pi 5) for projects and simple home automation. Why not put that how-to to work for some scheduling magic? I quickly looked up the cost of e-ink displays. It’s been one of things I’ve been tracking in price since I love how they were energy efficient and can look super futuristic. I’ve noticed that the Pi-specific 7.3″ board (a big step up from the typical 4″ ones I’ve seen through the years). It didn’t break the bank and it seems reliable enough through the reviews. I placed my order right and started to draw up the rest of the plan. We needed it to be easy to view but protected a bit so I opt to put it into a 5″ x 7″ photo frame that is a slight shadowbox style so we had some room to work with. I thought that mounting that on the wall in the living room wouldn’t look so out of place, so there’s that. Although, it would need to be plugged in to the AC outlet, a simple cover over the power cord can make it look good enough. It would also have to be a low powered Raspberry Pi version to keep with the whole low-energy and high energy efficiency theme. I knew that the boards I’ve had now wouldn’t do because they required more energy and it was almost too much for this project so I’ve opt with the lower energy Raspberry Pi Zero 2 WH (this is just the Pi Zero 2 W with the soldered on GPIO headers needed to communicate with external hardware or peripherals). You can see what the Raspberry Pi Zero 2 W can offer from the official statement:
At the heart of Raspberry Pi Zero 2 W is RP3A0, a custom-built system-in-package designed by Raspberry Pi in the UK. With a quad-core 64-bit ARM Cortex-A53 processor clocked at 1GHz and 512MB of SDRAM, Zero 2 is up to five times as fast as the original Raspberry Pi Zero. Wireless LAN is built into a shielded enclosure with improved RF compliance, giving you more flexibility when designing with Raspberry Pi Zero 2 W. All in the same tiny 65mm × 30mm form factor.
Low power draw, low profile and size, and just enough processing power for simple builds. You can see that this is already good enough for a simple project like a smart calendar, but I don’t have soldering skills yet so I just bought the one with the pre-soldered GPIO header that is usually already soldered on in the Pi 3 and up. Also, keep in mind that the view area is about the same size of a 5″ x 7″ photo in a frame and you should have an idea of where to put it that is readable. I have chosen a place on the wall, at eye-level, near the front door so everyone can give it a glance right as they put on their shoes and pick up their car keys to head out. And, instead of having to hunt for the day and events like a paper calendar, the smart calendar will show you the current day and upcoming event. If something looks wrong, then you can pull out your smartphone and edit it directly on the shared calendar. Liam has a soccer match at 4 PM instead of 6 PM, a few quick taps and now everyone will see it.
Also, here’s the good news about e-Ink displays like this. If you lose power and the Pi goes off, the e-Ink display will still display the last thing it had. So, that means you’re not “left in the dark” (pun intended) when you still need to look at the calendar. It may not be the most updated but you may get what you need anyway and that’s the point!
Also, why did I choose a Pi Kit with a metal case? I find that with good contact to thermal pad, the case also acts as a heat dispersal rather than lock it into a plastic case. This DIY project has the Pi and case poke out the back for cooling and I’m sure some modification could add some airflow to the frame we are using. Overall, we want passive cooling for a quieter mount and existence.
I also love mounting things to peg boards that can be used for other things like tacking on reminders, permission slips, and USB drives that are needed. Also with Ikea’s frame and pegboard system, you’ve got something that can be easily mounted and worked with. Also, any shadow-box style 5″ x 7″ frame should work with this. You may have to adjust the bumpers and padding inside to make sure it’s a snug fit and nothing will wiggle around. You should also take into account of air flow for the Pi but I’ve not had overheating issues with the Pi Zero. Also, I’ve chosen the half Skadis peg board at ~14″ x 22″ so that I could mount it along with a small magnetic white board and corkboard (forming a complete board conglomerate that sings like a fully formed Voltron robot).
I still suggest you have wireless spare keyboard/mouse combo, mini HDMI to HDMI cable, and an external monitor you borrow if something goes wrong and you have to connect the pi to diagnose stuff. I’ll add it to the optional-but-useful list for you below just in case. It’s like duct tape. You know, it’s just good for when you need to patch up anything. Handy to have on you, sitting besides your can of WD-40 and multi-tool.
The List (stuff you need)
Time: ~1 hour to 2 hours (depending how suave you are with electronics and coding)
Effort: Medium (need some computer how-to, command line typing, and a bit of hardware building)
Why: It’s really hard to get family coordinated when you have multiple extended family members with pick-up, drop-off, and holidays to coordinate together. This smart calendar is cheap, efficient, and low-powered (cost effective) that you can display right near the door or by the kitchen so that everyone is “in-the-loop” for the changes. When a holiday is coming up, you’ll see it on the weekly preview. When someone is picking up the kids, they note it on the shared calendar and it’ll show up on the smart calendar for all to see. We don’t need Uncle Bryan and Auntie Cathy to show up at the same time thinking the other wasn’t going to come.
Disclaimer: This project is provided for informational and educational purposes only. While I’ve documented my setup and approach, I make no guarantees that it will work in all environments or configurations. You are responsible for any modifications you make to hardware, software, or electrical components. Improper setup or handling may result in equipment damage, data loss, or personal injury. Use caution when working with electronics, power supplies, and mounting hardware. Always follow manufacturer guidelines and best practices. This project uses third-party services (such as the Google Calendar API), which are subject to their own terms of service and potential changes. I am not responsible for any issues resulting from API changes, rate limits, or service disruptions. Proceed at your own risk. This project is not a commercial product and is shared as-is. No warranties or support are provided. Always back up important data before experimenting.
Essentials (things needed to complete the bare minimum of this project):
- Raspberry Pi 2 Zero WH (modified with pre-soldered GPIO pins and thermal pads) kit: https://amzn.to/4uWxGBk
- Power supply (micro SD) with switch: https://amzn.to/47tlFcF
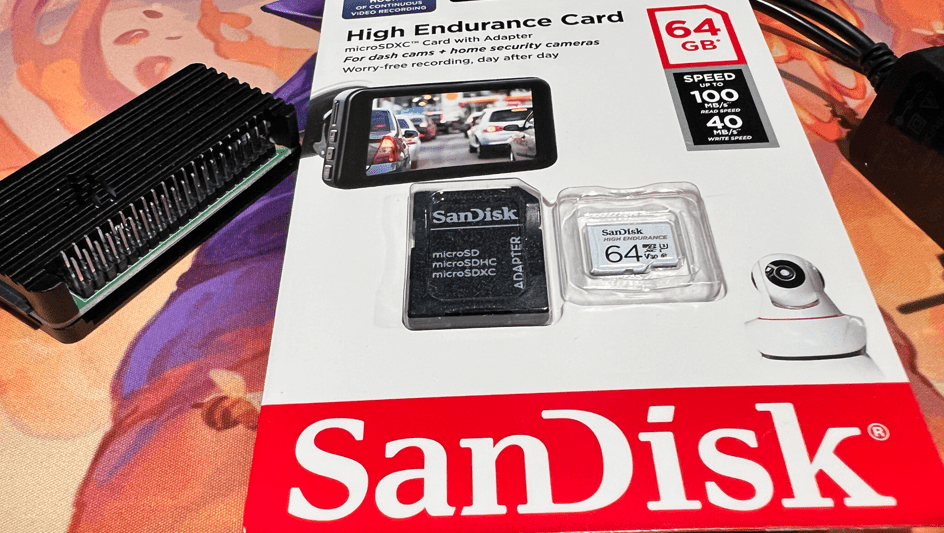
- SanDisk 64GB High Endurance Micro SD card: https://amzn.to/4tdAxEi
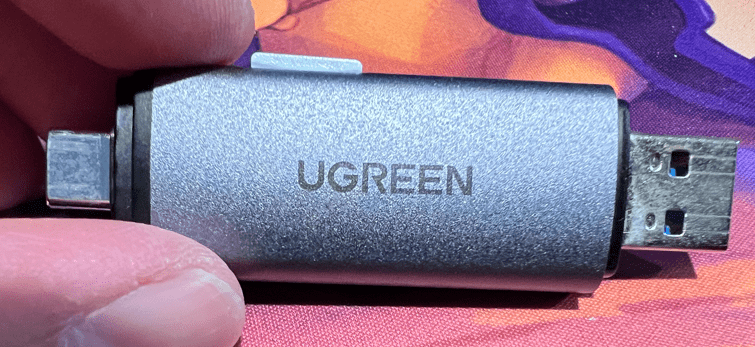
- uGreen SD Card Reader (for USB-A or USB-B): https://amzn.to/3PDfJrg
- Pimoroni’s Inky Impression 7.3″ (2025 refreshed design): https://www.pishop.us/product/inky-impression-7-3-2025-edition/
- IKEA 5″ x 7″ frame (Roedalm white frame works with my white peg board): https://www.ikea.com/us/en/p/roedalm-frame-white-10548872/
- 0.4″ x 0.12″ Hemispherical clear cabinet bumpers (need about 6): (I got the variety pack just in case) https://amzn.to/40YR1Ek
Optional-but-useful:
- A long extension cord with USB power (10-feet): https://amzn.to/4cv7KVd (this will be mounted on the Peg board or next to it to power the Pi and wires could be hidden behind the Peg board)
- Mini HDMI to HDMI cable: https://amzn.to/4lWsUj1
- Micro USB to USB-A splitter (can connect keyboard and mouse): https://amzn.to/4bS5XZR
- Logitech slim keyboard and mouse combo: https://amzn.to/3PAI2GS
- IKEA Skadis Peg board (I am actually mounting the picture frame to the peg board before attaching it to the wall): https://www.ikea.com/us/en/p/skadis-pegboard-white-50320805/
- Amazon Basic 29-Piece Precision Hobby Knife Set: https://amzn.to/3O4ZrXF (to cut the back of the picture frame and, optional, matte)
- Adhesive Cable Clips Clear (to hold the power source wire in place): https://amzn.to/3OnL017
Step 1. Getting ready
You’re going to need a little Python writing but it’s not so bad. I can honestly tell you that you can do it on notepad or Notepad++ as long as you check your work. I would suggest Notepad++, free program, that allows coloration of the code so that you can see what you’re doing. It’s lightweight and can help you find problems.
I am using Google Calendar with its API but I’m sure you can use any other calendar system that allows sharing and API access for the Pi (to grab the information needed to populate the calendar and update it). It’s also free since you’ll probably not going to be pulling data at the commercial level. Plus, even with a big family, you’re probably not going to be pulling that much anyway.
You would want to run this on your desktop before transferring it into the Pi since it will create the token.json need for logging into Google and getting the correct information from the calendar. But, the steps below also include ways of getting it through running the code in Pi and then doing some of the net authentication via link on your PC.
You’ll want to change the time zone (TIMEZONE = ‘America/Los_Angeles” to where you are at. I only have a few of them below but find the one you’re in and set it and save. I’m sure one of them will work for you.
North America
America/New_York: Eastern Time (EST/EDT)America/Chicago: Central Time (CST/CDT)America/Denver: Mountain Time (MST/MDT)America/Phoenix: Mountain Standard Time (Arizona – no Daylight Saving)America/Anchorage: Alaska TimePacific/Honolulu: Hawaii TimeAmerica/Toronto: Eastern Time (Canada)America/Mexico_City: Central Time (Mexico)
Europe & Africa
UTC: Coordinated Universal Time (Universal baseline)Europe/London: Greenwich Mean Time / British Summer TimeEurope/Paris: Central European Time (CET/CEST)Europe/Berlin: Central European TimeEurope/Moscow: Moscow TimeAfrica/Cairo: Eastern European TimeAfrica/Johannesburg: South Africa Standard Time
Asia & Oceania
Asia/Tokyo: Japan Standard Time (JST)Asia/Hong_Kong: Hong Kong TimeAsia/Singapore: Singapore TimeAsia/Kolkata: India Standard Time (IST)Asia/Seoul: Korea Standard TimeAsia/Dubai: Gulf Standard TimeAustralia/Sydney: Australian Eastern Time
South America
America/Sao_Paulo: Brasilia TimeAmerica/Argentina/Buenos_Aires: Argentina TimeAmerica/Bogota: Colombia Time
You’ll want to create a project folder (like “calendar” or “picalendar”) and name it something you’ll remember because you’ll have to access it again throughout the build. I first start with creating the base calendar_display.py Python file you’ll need to copy over to the Pi later. Create a file using Notepad or (my favorite) Notepad++ called calendar_display.py in your project folder and add the following code:
(click the arrow or here to the left to expand to see the code) Code for calendar_display.py Python file needed to fetch the correct information to grab the calendar info and run on your Pi.
#!/usr/bin/env python3
import os
from datetime import datetime, timedelta
from zoneinfo import ZoneInfo
from PIL import Image, ImageDraw, ImageFont
from google.auth.transport.requests import Request
from google.oauth2.credentials import Credentials
from google_auth_oauthlib.flow import InstalledAppFlow
from googleapiclient.discovery import build
# ============================================================
# Configuration
# ============================================================
SCOPES = ["https://www.googleapis.com/auth/calendar.readonly"]
TIMEZONE = "America/Los_Angeles"
WIDTH = 800
HEIGHT = 480
TOP_H = 252
BOTTOM_H = HEIGHT - TOP_H
MARGIN = 12
VISIBLE_HOURS = 6
WINDOW_STEP_HOURS = 1
HOUR_START_EARLIEST = 6
HOUR_START_LATEST = 18
# Place your own Google OAuth desktop client file here.
CREDENTIALS_FILE = "credentials.json"
# This file is created automatically after first sign-in.
TOKEN_FILE = "token.json"
PREVIEW_FILE = "preview.png"
# Set to True on the Raspberry Pi with a supported Inky display installed.
USE_INKY = False
ICON_DIR = "icons"
ICON_MAP = {
# =========================
# Core
# =========================
"birthday": os.path.join(ICON_DIR, "birthday.png"),
"holiday": os.path.join(ICON_DIR, "holiday.png"), # fallback
"school": os.path.join(ICON_DIR, "school.png"),
# =========================
# Major holidays
# =========================
"christmas": os.path.join(ICON_DIR, "christmas.png"),
"thanksgiving": os.path.join(ICON_DIR, "thanksgiving.png"),
"new_year": os.path.join(ICON_DIR, "new_year.png"),
"valentines": os.path.join(ICON_DIR, "valentines.png"),
"easter": os.path.join(ICON_DIR, "easter.png"),
"halloween": os.path.join(ICON_DIR, "halloween.png"),
"fourth_of_july": os.path.join(ICON_DIR, "fourth_of_july.png"),
# =========================
# Federal holidays
# =========================
"mlk_day": os.path.join(ICON_DIR, "mlk_day.png"),
"presidents_day": os.path.join(ICON_DIR, "presidents_day.png"),
"memorial_day": os.path.join(ICON_DIR, "memorial_day.png"),
"labor_day": os.path.join(ICON_DIR, "labor_day.png"),
"veterans_day": os.path.join(ICON_DIR, "veterans_day.png"),
# =========================
# School-specific
# =========================
"no_school": os.path.join(ICON_DIR, "no_school.png"),
"early_release": os.path.join(ICON_DIR, "early_release.png"),
# =========================
# Life / events
# =========================
"vacation": os.path.join(ICON_DIR, "vacation.png"),
"travel": os.path.join(ICON_DIR, "travel.png"),
"appointment": os.path.join(ICON_DIR, "appointment.png"),
"doctor": os.path.join(ICON_DIR, "doctor.png"),
}
# Replace these with your own calendars if needed.
CALENDAR_IDS = [
"primary",
# "your_calendar_id@group.calendar.google.com",
]
# Optional: map specific calendar IDs to color names from COLORS below.
CALENDAR_COLOR_MAP = {
# "your_school_calendar_id@group.calendar.google.com": "blue",
# "your_holiday_calendar_id@group.calendar.google.com": "red",
# "your_birthdays_calendar_id@group.calendar.google.com": "yellow",
}
COLORS = {
"black": (0, 0, 0),
"white": (255, 255, 255),
"red": (255, 0, 0),
"green": (0, 255, 0),
"blue": (0, 0, 255),
"yellow": (255, 255, 0),
"light_line": (180, 180, 180),
"divider": (200, 200, 200),
}
DEFAULT_EVENT_COLOR = "black"
TODAY_ACCENT_COLOR = "blue"
CURRENT_TIME_COLOR = "red"
SECTION_ACCENT_COLOR = "green"
# ============================================================
# Windows-safe date/time formatting
# ============================================================
def format_day_number(dt: datetime) -> str:
return str(dt.day)
def format_hour_ampm(dt: datetime) -> str:
hour = dt.hour % 12 or 12
return f"{hour} {dt.strftime('%p')}"
def format_time_ampm(dt: datetime) -> str:
hour = dt.hour % 12 or 12
return f"{hour}:{dt.strftime('%M %p')}"
def format_short_time(dt: datetime) -> str:
hour = dt.hour % 12 or 12
minute = dt.strftime("%M")
ampm = dt.strftime("%p")
if minute == "00":
return f"{hour} {ampm}"
return f"{hour}:{minute} {ampm}"
def format_weekday_month_day(dt: datetime) -> str:
return f"{dt.strftime('%a')} {dt.month}/{dt.day}"
# ============================================================
# Fonts
# ============================================================
def load_font(size: int, bold: bool = False):
candidates = []
if bold:
candidates = [
"/usr/share/fonts/truetype/dejavu/DejaVuSans-Bold.ttf",
"/Library/Fonts/Arial Bold.ttf",
"/System/Library/Fonts/Supplemental/Arial Bold.ttf",
"C:/Windows/Fonts/arialbd.ttf",
"C:/Windows/Fonts/segoeuib.ttf",
]
else:
candidates = [
"/usr/share/fonts/truetype/dejavu/DejaVuSans.ttf",
"/Library/Fonts/Arial.ttf",
"/System/Library/Fonts/Supplemental/Arial.ttf",
"C:/Windows/Fonts/arial.ttf",
"C:/Windows/Fonts/segoeui.ttf",
]
for path in candidates:
if os.path.exists(path):
return ImageFont.truetype(path, size=size)
return ImageFont.load_default()
FONT_XS = load_font(12)
FONT_SM = load_font(14)
FONT_MD = load_font(16)
FONT_LG = load_font(20, bold=True)
FONT_XL = load_font(30, bold=True)
FONT_XXL = load_font(54, bold=True)
# ============================================================
# Google Calendar Auth
# ============================================================
def get_google_service():
creds = None
if os.path.exists(TOKEN_FILE):
creds = Credentials.from_authorized_user_file(TOKEN_FILE, SCOPES)
if not creds or not creds.valid:
if creds and creds.expired and creds.refresh_token:
creds.refresh(Request())
else:
if not os.path.exists(CREDENTIALS_FILE):
raise FileNotFoundError(
f"Missing {CREDENTIALS_FILE}. Put your own OAuth client file in the same folder as this script."
)
flow = InstalledAppFlow.from_client_secrets_file(CREDENTIALS_FILE, SCOPES)
creds = flow.run_local_server(port=0)
with open(TOKEN_FILE, "w", encoding="utf-8") as token:
token.write(creds.to_json())
return build("calendar", "v3", credentials=creds)
# ============================================================
# Event fetching
# ============================================================
def parse_google_datetime(dt_str: str, tz_name: str):
tz = ZoneInfo(tz_name)
if "T" in dt_str:
dt = datetime.fromisoformat(dt_str.replace("Z", "+00:00"))
return dt.astimezone(tz), False
dt = datetime.fromisoformat(dt_str).replace(tzinfo=tz)
return dt, True
def fetch_events(service, calendar_ids, days_back=0, days_forward=7, tz_name=TIMEZONE):
tz = ZoneInfo(tz_name)
now = datetime.now(tz)
time_min = (now - timedelta(days=days_back)).isoformat()
time_max = (now + timedelta(days=days_forward)).isoformat()
all_events = []
for cal_id in calendar_ids:
page_token = None
while True:
result = (
service.events()
.list(
calendarId=cal_id,
timeMin=time_min,
timeMax=time_max,
singleEvents=True,
orderBy="startTime",
pageToken=page_token,
)
.execute()
)
for item in result.get("items", []):
start_raw = item["start"].get("dateTime") or item["start"].get("date")
end_raw = item["end"].get("dateTime") or item["end"].get("date")
start_dt, start_all_day = parse_google_datetime(start_raw, tz_name)
end_dt, end_all_day = parse_google_datetime(end_raw, tz_name)
if start_all_day and end_all_day:
end_dt = end_dt - timedelta(days=1)
all_events.append(
{
"calendar_id": cal_id,
"title": item.get("summary", "(No title)"),
"description": item.get("description", ""),
"location": item.get("location", ""),
"start": start_dt,
"end": end_dt,
"all_day": start_all_day and end_all_day,
"raw": item,
}
)
page_token = result.get("nextPageToken")
if not page_token:
break
all_events.sort(key=lambda e: (e["start"], e["title"].lower()))
return all_events
# ============================================================
# Event helpers
# ============================================================
def start_of_week(dt: datetime):
return dt.replace(hour=0, minute=0, second=0, microsecond=0) - timedelta(days=dt.weekday())
def get_week_events(events, week_start):
week_end = week_start + timedelta(days=7)
out = []
for e in events:
event_day = e["start"].replace(hour=0, minute=0, second=0, microsecond=0)
if week_start <= event_day < week_end:
out.append(e)
return out
def get_day_events(events, day_dt):
day_start = day_dt.replace(hour=0, minute=0, second=0, microsecond=0)
day_end = day_start + timedelta(days=1)
out = []
for e in events:
if e["all_day"]:
if e["start"].date() <= day_start.date() <= e["end"].date():
out.append(e)
else:
if e["start"] < day_end and e["end"] >= day_start:
out.append(e)
return out
def get_next_upcoming_event(events, now_dt):
for e in events:
if e["all_day"]:
continue
if e["end"] >= now_dt:
return e
return None
def choose_visible_hour_window(now_dt):
current_hour = now_dt.hour
start_hour = max(HOUR_START_EARLIEST, current_hour - 2)
start_hour = (start_hour // WINDOW_STEP_HOURS) * WINDOW_STEP_HOURS
latest_safe_start = min(HOUR_START_LATEST, 24 - VISIBLE_HOURS)
start_hour = min(start_hour, latest_safe_start)
end_hour = start_hour + VISIBLE_HOURS
return start_hour, end_hour
def format_time_range(event):
if event["all_day"]:
return "All day"
return f"{format_time_ampm(event['start'])} - {format_time_ampm(event['end'])}"
def get_event_icon_key(event):
text = f"{event['title']} {event['description']}".lower()
if "birthday" in text or "bday" in text:
return "birthday"
if "christmas" in text:
return "christmas"
if "thanksgiving" in text:
return "thanksgiving"
if "new year" in text or "new year's" in text:
return "new_year"
if "valentine" in text:
return "valentines"
if "easter" in text:
return "easter"
if "halloween" in text:
return "halloween"
if (
"independence day" in text
or "4th of july" in text
or "fourth of july" in text
):
return "fourth_of_july"
if "mlk" in text or "martin luther king" in text:
return "mlk_day"
if "presidents" in text:
return "presidents_day"
if "memorial day" in text:
return "memorial_day"
if "labor day" in text:
return "labor_day"
if "veterans day" in text:
return "veterans_day"
if "no school" in text:
return "no_school"
if "early release" in text or "minimum day" in text:
return "early_release"
if "doctor" in text or "dentist" in text:
return "doctor"
if "appointment" in text:
return "appointment"
if "vacation" in text:
return "vacation"
if "flight" in text or "travel" in text or "trip" in text:
return "travel"
if "holiday" in text:
return "holiday"
if (
"school" in text
or "late start" in text
or "teacher" in text
or "conference" in text
):
return "school"
return None
def get_event_color_key(event):
cal_id = event.get("calendar_id", "")
if cal_id in CALENDAR_COLOR_MAP:
mapped = CALENDAR_COLOR_MAP[cal_id]
if mapped in COLORS:
return mapped
text = f"{event['title']} {event['description']}".lower()
if "birthday" in text or "bday" in text:
return "yellow"
if (
"holiday" in text
or "christmas" in text
or "thanksgiving" in text
or "new year" in text
or "easter" in text
):
return "red"
if (
"school" in text
or "no school" in text
or "minimum day" in text
or "late start" in text
or "teacher" in text
or "conference" in text
):
return "blue"
return DEFAULT_EVENT_COLOR
def load_icons():
icons = {}
for key, path in ICON_MAP.items():
if os.path.exists(path):
try:
icons[key] = Image.open(path).convert("RGBA")
except Exception:
pass
return icons
def resize_icon(icon, size=40):
return icon.resize((size, size))
# ============================================================
# Drawing helpers
# ============================================================
def text_size(draw, text, font):
bbox = draw.textbbox((0, 0), text, font=font)
return bbox[2] - bbox[0], bbox[3] - bbox[1]
def truncate(text, max_chars):
if len(text) <= max_chars:
return text
return text[: max_chars - 1] + "…"
# ============================================================
# Rendering
# ============================================================
def render_calendar(events, tz_name=TIMEZONE):
tz = ZoneInfo(tz_name)
now = datetime.now(tz)
today = now.replace(hour=0, minute=0, second=0, microsecond=0)
week_start = start_of_week(today)
img = Image.new("RGB", (WIDTH, HEIGHT), COLORS["white"])
draw = ImageDraw.Draw(img)
draw.rectangle((0, 0, WIDTH - 1, HEIGHT - 1), outline=COLORS["black"], width=1)
draw.line((0, TOP_H, WIDTH, TOP_H), fill=COLORS["black"], width=2)
week_events = get_week_events(events, week_start)
day_events = get_day_events(events, today)
next_event = get_next_upcoming_event(events, now)
icons = load_icons()
render_top_weekly_timeline(draw, week_events, now, week_start)
render_bottom_detail_panel(img, draw, day_events, today, now, next_event, icons)
return img
def render_top_weekly_timeline(draw, events, now_dt, week_start):
left = MARGIN
top = MARGIN
right = WIDTH - MARGIN
bottom = TOP_H - MARGIN
title_h = 34
time_label_w = 48
draw.text((left, top - 1), "Weekly View", font=FONT_XL, fill=COLORS["black"])
grid_top = top + title_h + 10
grid_left = left + time_label_w
grid_right = right
grid_bottom = bottom
days = 7
col_w = (grid_right - grid_left) / days
hour_start, hour_end = choose_visible_hour_window(now_dt)
total_hours = hour_end - hour_start
px_per_hour = (grid_bottom - grid_top) / total_hours
draw.rectangle((grid_left, grid_top, grid_right, grid_bottom), outline=COLORS["black"], width=1)
for hr in range(hour_start, hour_end + 1):
y = grid_top + (hr - hour_start) * px_per_hour
if hr == hour_start or hr == hour_end:
draw.line((grid_left, y, grid_right, y), fill=COLORS["black"], width=1)
elif hr % 2 == 0:
draw.line((grid_left, y, grid_right, y), fill=COLORS["light_line"], width=1)
if hr < hour_end and 0 <= hr <= 23:
label_dt = now_dt.replace(hour=hr, minute=0, second=0, microsecond=0)
label = format_hour_ampm(label_dt)
_, th = text_size(draw, label, FONT_XS)
draw.text((left, y - th / 2), label, font=FONT_XS, fill=COLORS["black"])
for i in range(1, days):
x = grid_left + i * col_w
draw.line((x, grid_top, x, grid_bottom), fill=COLORS["light_line"], width=1)
for i in range(days):
day = week_start + timedelta(days=i)
x0 = grid_left + i * col_w
x1 = x0 + col_w
label = format_weekday_month_day(day)
tw, th = text_size(draw, label, FONT_SM)
label_x = x0 + (col_w - tw) / 2
label_y = grid_top - th - 6
draw.text((label_x, label_y), label, font=FONT_SM, fill=COLORS["black"])
if day.date() == now_dt.date():
draw.rectangle(
(x0 + 1, grid_top + 1, x1 - 1, grid_bottom - 1),
outline=COLORS[TODAY_ACCENT_COLOR],
width=3,
)
draw.rectangle(
(x0 + 2, grid_top + 2, x1 - 2, grid_top + 8),
fill=COLORS[TODAY_ACCENT_COLOR],
)
current_decimal = now_dt.hour + (now_dt.minute / 60.0)
if hour_start <= current_decimal <= hour_end:
current_y = grid_top + (current_decimal - hour_start) * px_per_hour
draw.line(
(grid_left, current_y, grid_right, current_y),
fill=COLORS[CURRENT_TIME_COLOR],
width=2,
)
draw.ellipse(
(grid_left - 5, current_y - 4, grid_left + 3, current_y + 4),
outline=COLORS[CURRENT_TIME_COLOR],
fill=COLORS[CURRENT_TIME_COLOR],
)
events_by_day = {i: [] for i in range(7)}
for event in events:
idx = (event["start"].date() - week_start.date()).days
if 0 <= idx < 7:
events_by_day[idx].append(event)
for day_idx, day_events in events_by_day.items():
day_events.sort(key=lambda e: (e["all_day"], e["start"]))
all_day_events = [e for e in day_events if e["all_day"]]
timed_events = [e for e in day_events if not e["all_day"]]
x_day_left = grid_left + day_idx * col_w
x_day_right = x_day_left + col_w
all_day_y = grid_top + 6
for i, event in enumerate(all_day_events[:2]):
event_color = COLORS[get_event_color_key(event)]
y0 = all_day_y + i * 20
y1 = y0 + 16
x0 = x_day_left + 5
x1 = x_day_right - 5
draw.rounded_rectangle((x0, y0, x1, y1), radius=4, outline=event_color, width=2)
draw.text((x0 + 4, y0 + 1), truncate(event["title"], 12), font=FONT_XS, fill=COLORS["black"])
if len(all_day_events) > 2:
more_count = len(all_day_events) - 2
y0 = all_day_y + 40
y1 = y0 + 14
x0 = x_day_left + 8
x1 = x0 + 28
draw.rounded_rectangle((x0, y0, x1, y1), radius=4, outline=COLORS["black"], width=1)
draw.text((x0 + 5, y0), f"+{more_count}", font=FONT_XS, fill=COLORS["black"])
MAX_EVENTS_PER_DAY = 4
visible_events = timed_events[:MAX_EVENTS_PER_DAY]
overflow_count = max(0, len(timed_events) - MAX_EVENTS_PER_DAY)
if visible_events:
padding = 7
visible_count = max(1, len(visible_events))
usable_width = col_w - (padding * (visible_count + 1))
lane_w = usable_width / visible_count
ROW_HEIGHT = 14
row_gap = 2
base_y = grid_top + (hour_end - hour_start - 1) * px_per_hour
for visible_index, event in enumerate(visible_events):
event_color = COLORS[get_event_color_key(event)]
row_index = visible_index // visible_count
col_index = visible_index % visible_count
y0 = base_y + row_index * (ROW_HEIGHT + row_gap)
y1 = y0 + ROW_HEIGHT
y0 -= 1
y1 -= 1
total_width = visible_count * lane_w + (visible_count - 1) * padding
start_x = x_day_left + (col_w - total_width) / 2
x0 = start_x + col_index * (lane_w + padding)
x1 = x0 + lane_w
max_x1 = x_day_right - padding
if x1 > max_x1:
x1 = max_x1
draw.rounded_rectangle(
(x0, y0, x1, y1),
radius=7,
fill=(248, 248, 248),
outline=event_color,
width=2,
)
if lane_w > 48:
draw.text(
(x0 + 3, y0),
truncate(event["title"], 9),
font=FONT_XS,
fill=COLORS["black"],
)
if overflow_count > 0:
overflow_y0 = base_y + ROW_HEIGHT + 2
overflow_y1 = overflow_y0 + 14
overflow_x0 = x_day_left + 10
overflow_x1 = overflow_x0 + 58
overflow_y0 -= 1
overflow_y1 -= 1
draw.rounded_rectangle(
(overflow_x0, overflow_y0, overflow_x1, overflow_y1),
radius=4,
outline=COLORS["light_line"],
width=1,
)
draw.text(
(overflow_x0 + 4, overflow_y0),
f"+{overflow_count} more",
font=FONT_XS,
fill=COLORS["black"],
)
def render_bottom_detail_panel(img, draw, day_events, today_dt, now_dt, next_event, icons):
left = MARGIN
top = TOP_H + MARGIN
right = WIDTH - MARGIN
bottom = HEIGHT - MARGIN
left_w = 232
gap = 16
right_x = left + left_w + gap
right_w = right - right_x
draw.text((left, top), today_dt.strftime("%A"), font=FONT_XL, fill=COLORS["black"])
draw.text((left, top + 44), format_day_number(today_dt), font=FONT_XXL, fill=COLORS["black"])
draw.text((left, top + 110), today_dt.strftime("%B %Y"), font=FONT_MD, fill=COLORS["black"])
draw.line(
(left, top + 142, left + 220, top + 142),
fill=COLORS[SECTION_ACCENT_COLOR],
width=2,
)
draw.line(
(left + left_w + 4, top, left + left_w + 4, bottom),
fill=COLORS["divider"],
width=1,
)
key_for_day = None
for e in day_events:
k = get_event_icon_key(e)
if k:
key_for_day = k
break
if key_for_day and key_for_day in icons:
icon = resize_icon(icons[key_for_day], size=40)
img.paste(icon, (left + 96, top + 48), icon)
all_day_events = [e for e in day_events if e["all_day"]]
timed_events = [e for e in day_events if not e["all_day"]]
timed_events.sort(key=lambda e: e["start"])
stats_y = top + 156
draw.text((left, stats_y), f"All-day: {len(all_day_events)}", font=FONT_SM, fill=COLORS["black"])
draw.text((left, stats_y + 22), f"Timed: {len(timed_events)}", font=FONT_SM, fill=COLORS["black"])
y = top
draw.text((right_x, y), "Today", font=FONT_LG, fill=COLORS["black"])
y += 26
draw.line((right_x, y, right, y), fill=COLORS["black"], width=1)
y += 10
if all_day_events:
draw.text((right_x, y), "All-day", font=FONT_MD, fill=COLORS["black"])
y += 20
for e in all_day_events[:3]:
y = draw_event_line(img, draw, e, right_x, y, right_w, icons)
y += 8
draw.text((right_x, y), "Next Event", font=FONT_MD, fill=COLORS["black"])
y += 22
if next_event and next_event["start"].date() == today_dt.date():
y = draw_featured_event(img, draw, next_event, right_x, y, right_w, icons)
else:
y = draw_empty_card(
draw,
x=right_x,
y=y,
w=right_w,
h=52,
title="Free for the rest of the day",
subtitle="No more timed events today.",
)
draw.text((right_x, y), "Upcoming Today", font=FONT_MD, fill=COLORS["black"])
y += 22
upcoming_events = [e for e in timed_events if e["end"] >= now_dt]
if len(upcoming_events) == 0:
y = draw_empty_card(
draw,
x=right_x,
y=y,
w=right_w,
h=50,
title="Nothing upcoming",
subtitle="Enjoy your day.",
)
elif len(upcoming_events) <= 4:
for e in upcoming_events[:4]:
y = draw_event_line(img, draw, e, right_x, y, right_w, icons)
else:
y = draw_upcoming_two_columns(draw, upcoming_events[:6], right_x, y, right_w)
def draw_featured_event(img, draw, event, x, y, w, icons):
box_h = 60
event_color = COLORS[get_event_color_key(event)]
draw.rounded_rectangle((x, y, x + w, y + box_h), radius=8, outline=event_color, width=1)
icon_key = get_event_icon_key(event)
text_x = x + 12
if icon_key and icon_key in icons:
icon = resize_icon(icons[icon_key], size=30)
img.paste(icon, (x + 12, y + 14), icon)
text_x = x + 50
draw.text((text_x, y + 8), truncate(event["title"], 34), font=FONT_MD, fill=event_color)
draw.text((text_x, y + 32), format_time_range(event), font=FONT_SM, fill=COLORS["black"])
return y + box_h + 12
def draw_event_line(img, draw, event, x, y, w, icons):
line_h = 26
event_color = COLORS[get_event_color_key(event)]
icon_key = get_event_icon_key(event)
text_x = x
if icon_key and icon_key in icons:
icon = resize_icon(icons[icon_key], size=16)
img.paste(icon, (x, y + 3), icon)
text_x = x + 22
label = f"{format_time_range(event)} {event['title']}"
draw.text((text_x, y), truncate(label, 68), font=FONT_SM, fill=event_color)
return y + line_h
def draw_upcoming_two_columns(draw, events, x, y, w):
col_gap = 14
col_w = (w - col_gap) / 2
row_h = 22
for idx, event in enumerate(events):
col = idx % 2
row = idx // 2
item_x = x + col * (col_w + col_gap)
item_y = y + row * row_h
event_color = COLORS[get_event_color_key(event)]
label = f"{format_short_time(event['start'])} {event['title']}"
draw.text((item_x, item_y), truncate(label, 22), font=FONT_SM, fill=event_color)
rows = (len(events) + 1) // 2
return y + rows * row_h
def draw_empty_card(draw, x, y, w, h, title, subtitle):
draw.rounded_rectangle((x, y, x + w, y + h), radius=8, outline=COLORS["black"], width=1)
draw.text((x + 12, y + 8), title, font=FONT_MD, fill=COLORS["black"])
draw.text((x + 12, y + 28), subtitle, font=FONT_SM, fill=COLORS["black"])
return y + h + 12
# ============================================================
# Output
# ============================================================
def output_image(img):
if USE_INKY:
from inky.auto import auto
display = auto()
display.set_image(img)
display.show()
print("Displayed on Inky.")
else:
img.save(PREVIEW_FILE)
print(f"Saved preview to {PREVIEW_FILE}")
# ============================================================
# Main
# ============================================================
def main():
service = get_google_service()
events = fetch_events(service, CALENDAR_IDS, days_back=0, days_forward=7, tz_name=TIMEZONE)
img = render_calendar(events, tz_name=TIMEZONE)
output_image(img)
if __name__ == "__main__":
main()
There are a few things you may want to change, especially in the region and time zone as well as the 12-hour clock to 24-hour clock. Other than that, the rest can work pretty well if you’re OK without tweaks. If you know Python, then you can easily tweak the calendar to change color, sizing, and everything else in between. I hope this will inspire others.
Step 2. Setting up the Calendar API
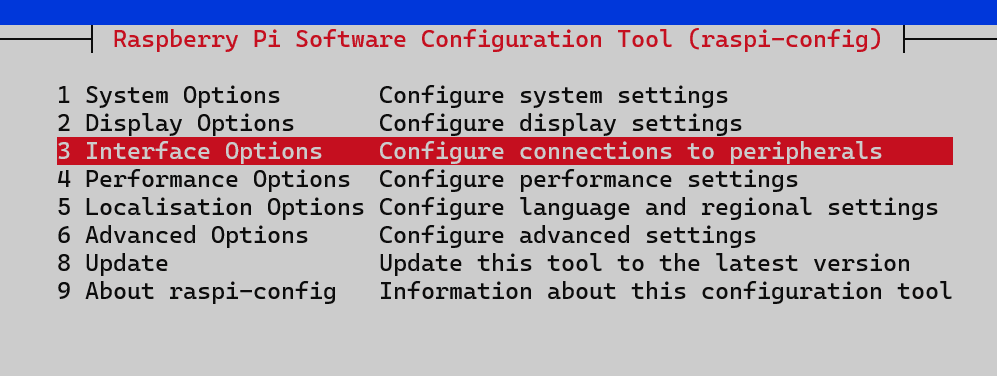
This step is for Google shared calendar, but I believe there are other options out there as well but you’ll have to find them beyond this site. Now for this Google calendar integration, you’re going to need to use or create a Google account and you’ll need to grab the Google Calendar API. What’s an API? Think of it as a way for some product to communicate with external things in the world. In this case, the product the Google Calendar.
Also, if you’re worried, most families won’t go over the request-per-day limits to the API. So, this will typically stay free for casual family usage. I would suggest a fetch every 10 minutes or 30 minutes.
Since you know your Google account login, go to Google Cloud Console: https://console.cloud.google.com/
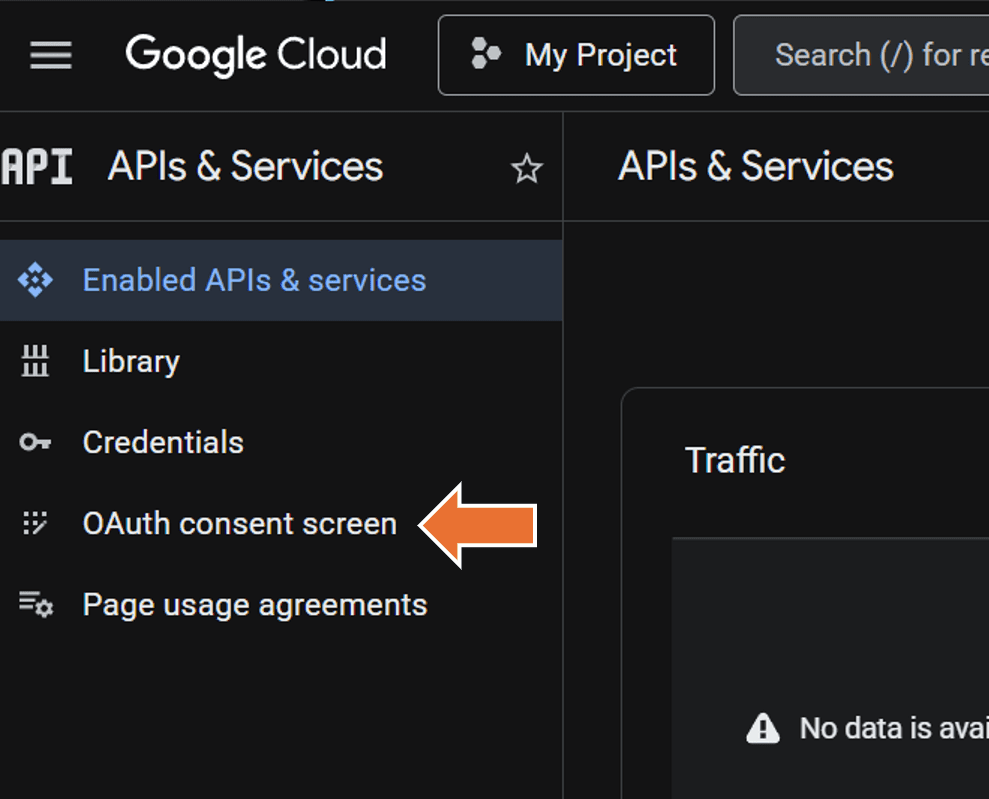
After logging in, head to APIs & Services.

Then Oauth consent screen
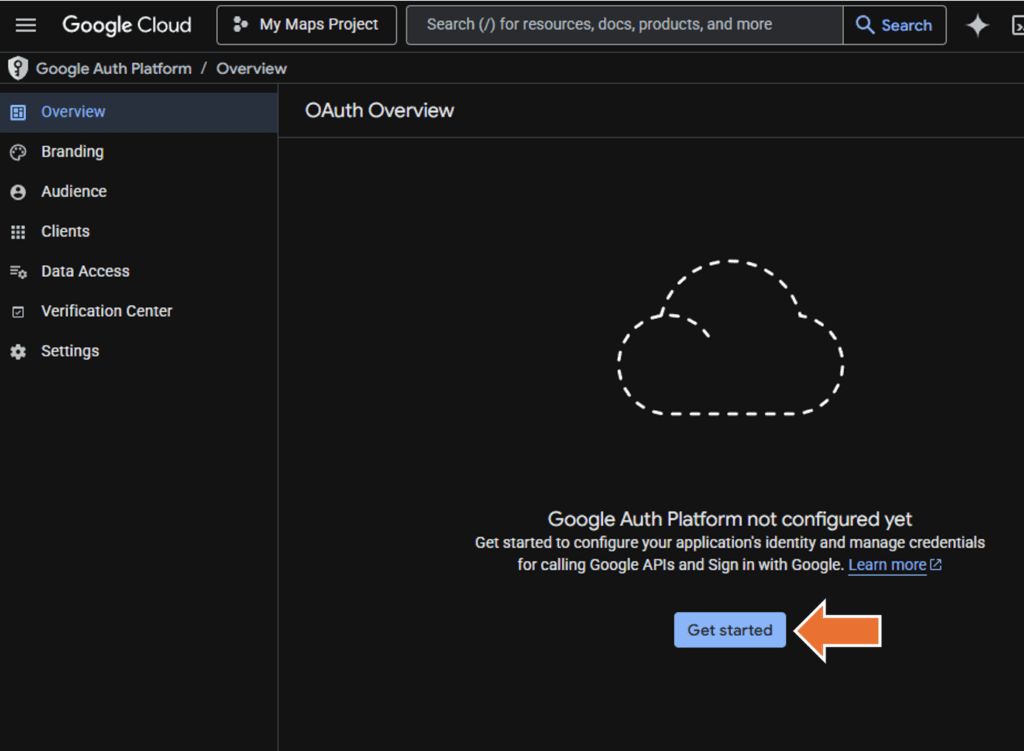
Then, since we’ve just started, we need to configure this project. So, hit Get Started button.
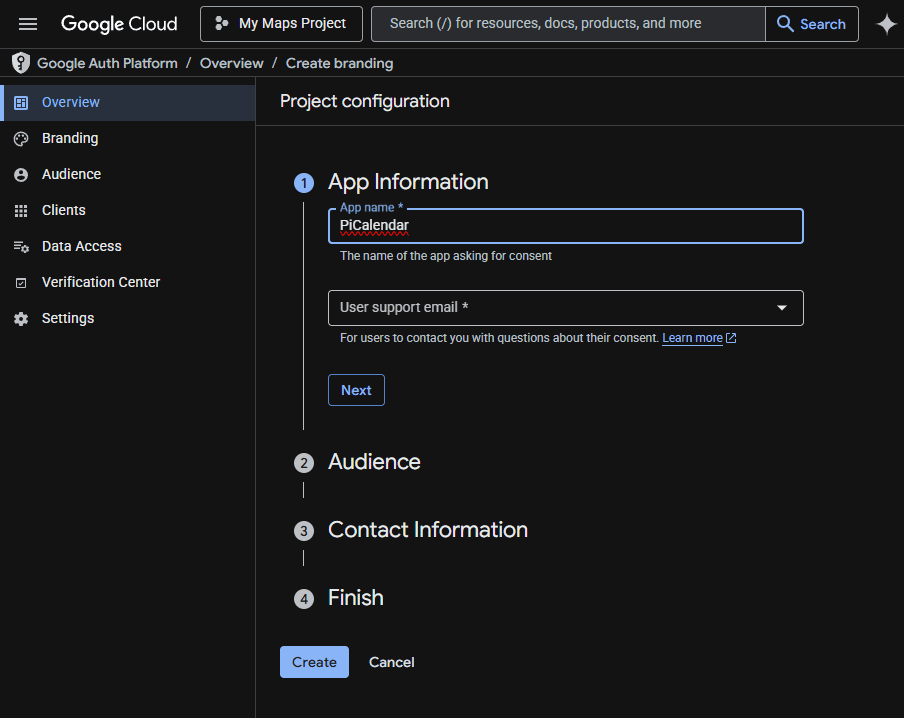
Give it a name like PiCalendar or SmartCalendar or something like that.
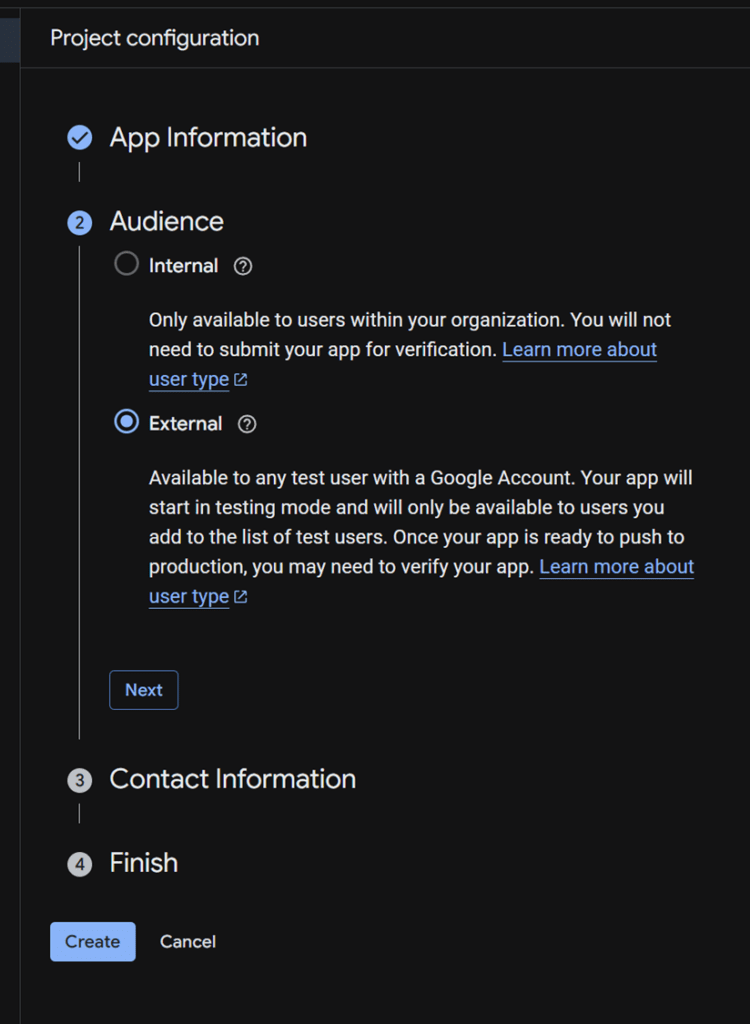
Then, choose Eternal for the Audience
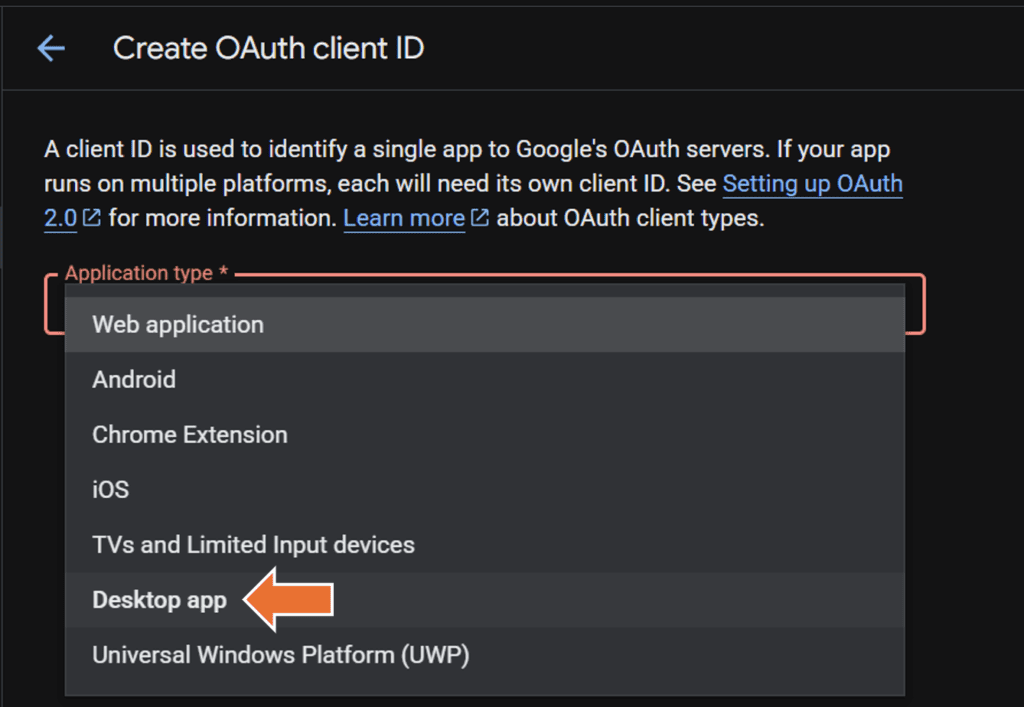
Then, Desktop app since we’re going to run this on the Pi.
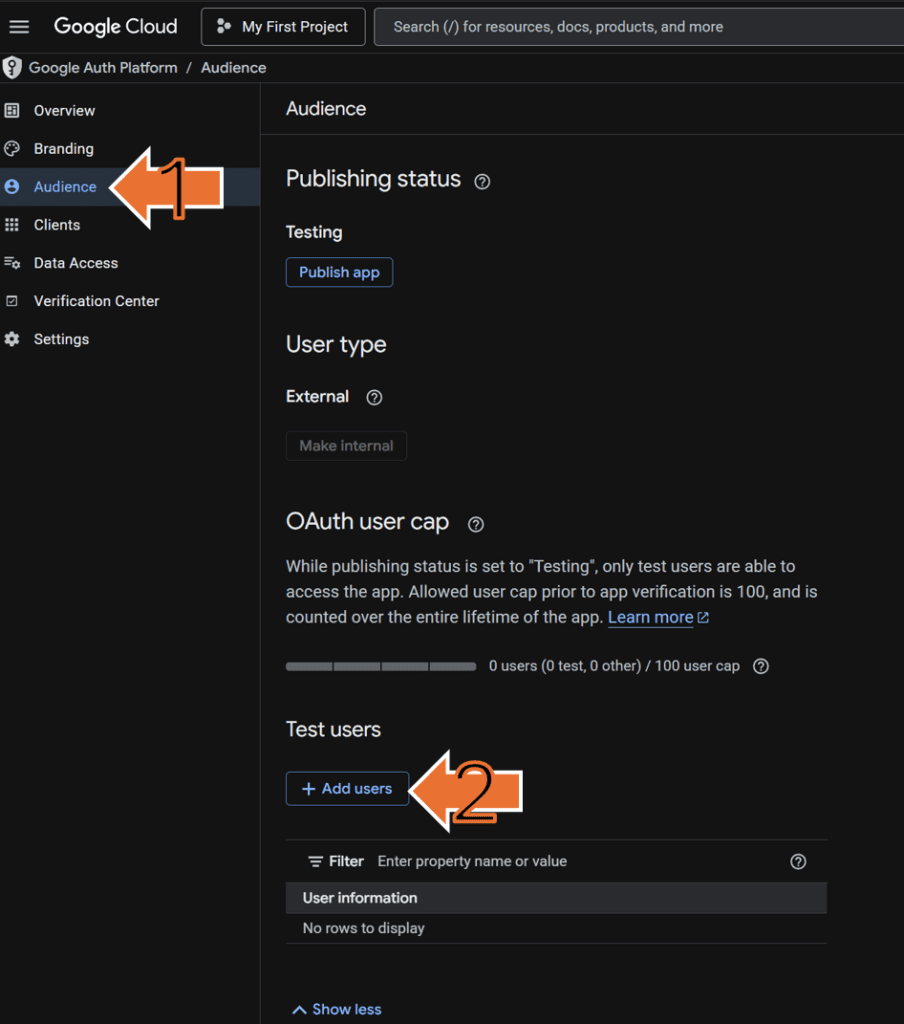
Now we have add “test users” to get this working. Click on the triple bar menu in the upper left.
Click on Audience in the left menu and click Add users. Then add the Google account you’re going to log into the Pi to get the Calendar.
Now, this is where you’ll need to run Python on your computer if you’re going to run the Pi headless. You’ll need to grab the token.json and calendar.json to be copied over later. You can also do this later and not on your PC as you’ll see below with running on Pi but activating on your PC using the url.
Remember where your calendar_display.py file was created? You’ll need it now.
Grab your credentials.json file before you start. If you can’t find it, you can go to https://console.cloud.google.com/apis/credentials then find the OAuth client with a name like “Desktop client 1” and the download button will be on the right. It’ll download a file named “client_secret….json” which you will have to rename to “credentials.json”. Then, put it in the project folder along with calendar_display.py. At this point, you won’t have tokens.json until you run the python code and that can be done with the Pi after file transfer.
Make sure your have both calendar_display.py and your credentials.json in the same folder.
This end portion of the instructions is for obtaining the tokens.json on your PC before you move it to the Pi. You can technically skip this step to get the tokens.json after transferring to the Pi.
Now open command prompt (you can search CMD in your PC’s search bar).
Navigate to where you placed the files. For example, if it’s in PiCalendar folder in D drive, navigate there the long way like I do by typing in D: first to get to D drive then cd picalendar to go to the subfolder. You should be in D:\picalendar> and now you can run python and the calendar_display.py script to get started.
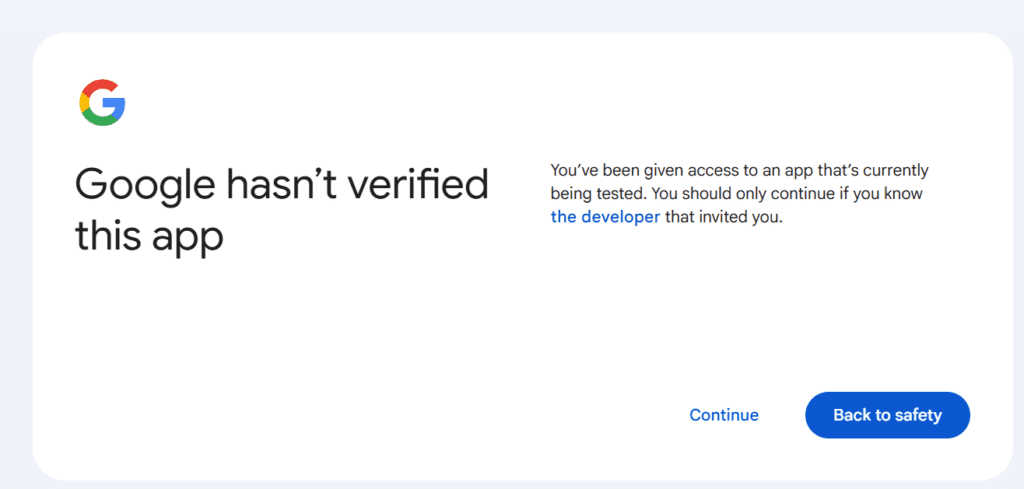
python3 calendar_display.pyIt should open up a browser for you to log in and authenticate. You’ll probably see a semi-scary screen below but it’s just to warn that it’s not a published app yet. Click continue and then allow in the permission screen.
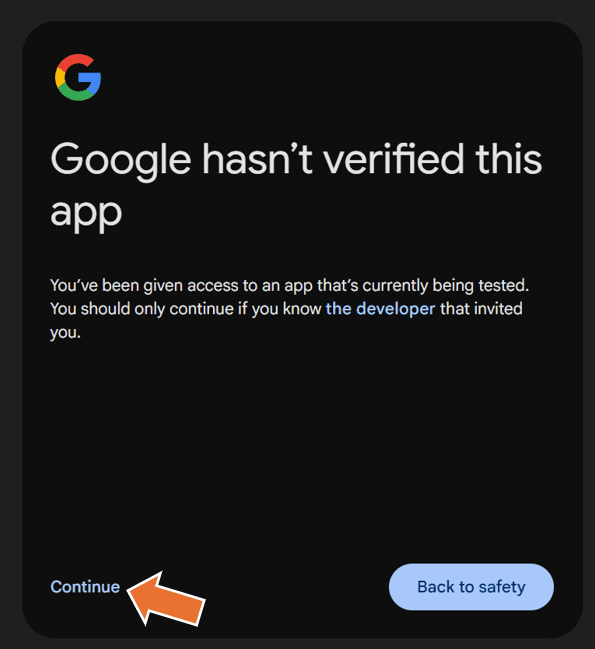
Once that is done, you should have token.json along with the other two files. These are very important files that you will need to transfer to the Pi Zero 2 to get the calendar to communicate and work with Google Calendar through its API.

Step 3. Build the Raspberry Pi
Now that you have your basic codes to run your smart calendar on your PC, we can turn to building the Pi Zero 2 WH. If you’ve bought the same things I’ve got above, then you can follow along below and get everything together in under 10 minutes.
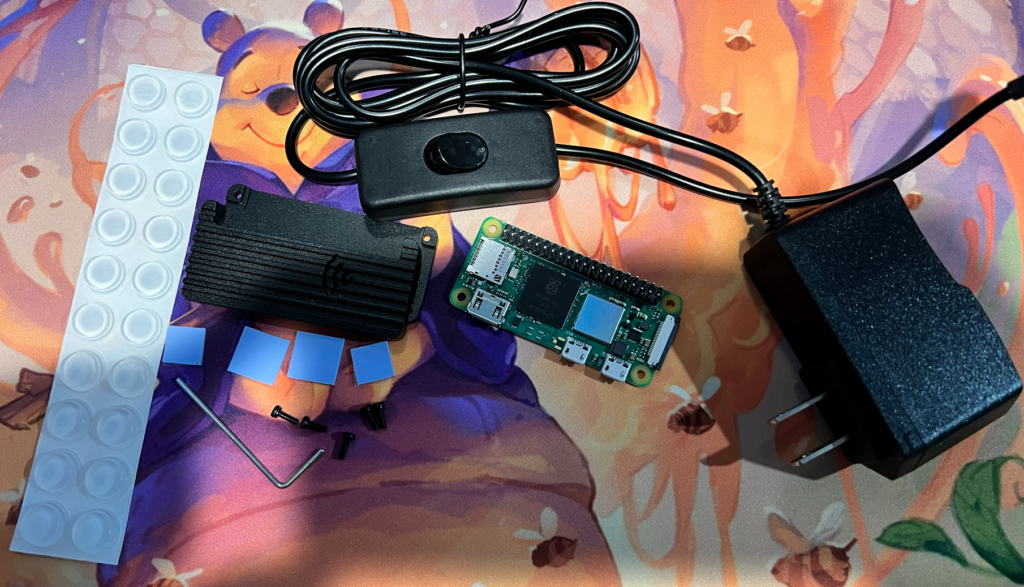
Here’s all the parts including the bumpers for show. You can see the thermal pads and case from the kit. The power with the switch is nice because sometimes you may want to just shutdown before a vacation and flip the switch to ensure it’s off while you’re on a trip.
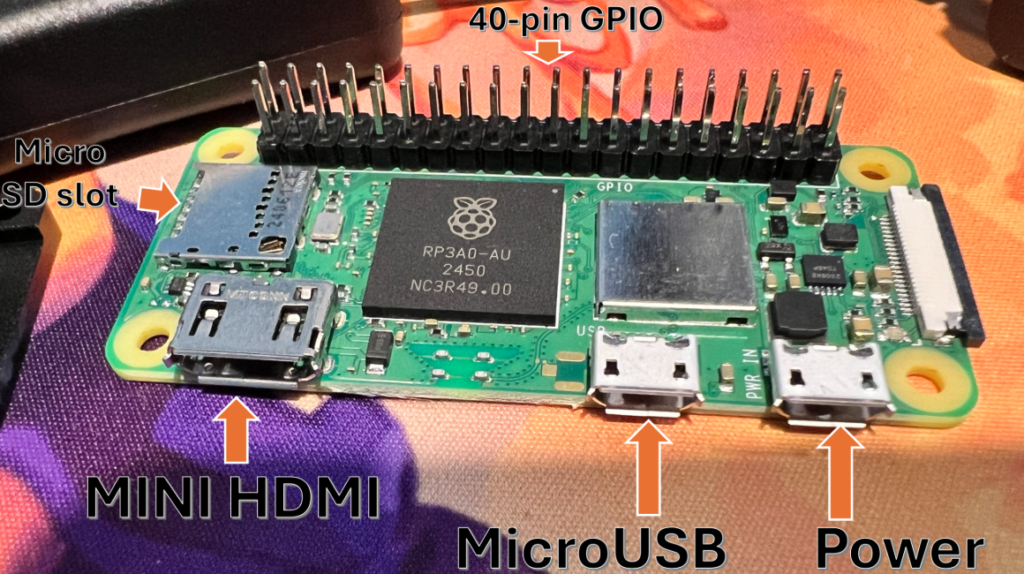
Here are all the ports including the soldered on 40-pin GPIO that is standard with the WH version of the Pi Zero 2. But, you should always test it within the return window. Notice how the power supply can only go in the furthest right-most micro USB plug. The middle one is for data.
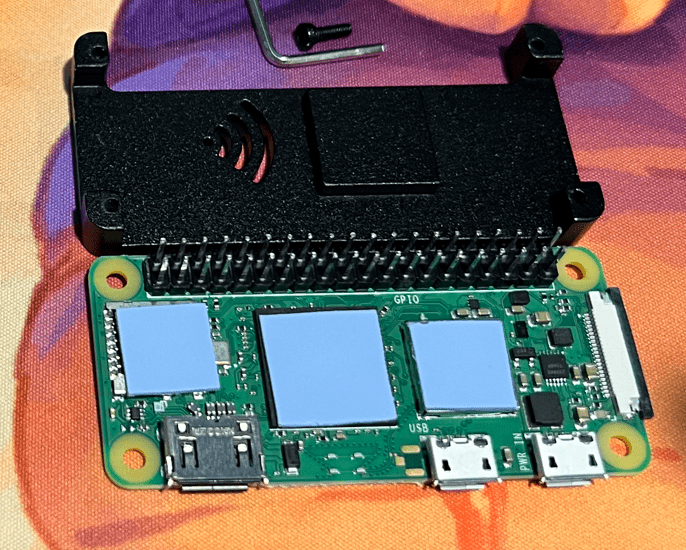
The thermal pads attached (blue sticky pads) that came with the case. You can also see that the case will make contact with the processor’s thermal pad so that heat is transferred to the case and the case itself will be a heatsink. I’ve added some beyond the processor including the SD card slot (laugh all you want, radiate that heat!). Now, I’m ready to add the the rest of the metal case and put in the screws to secure it all.
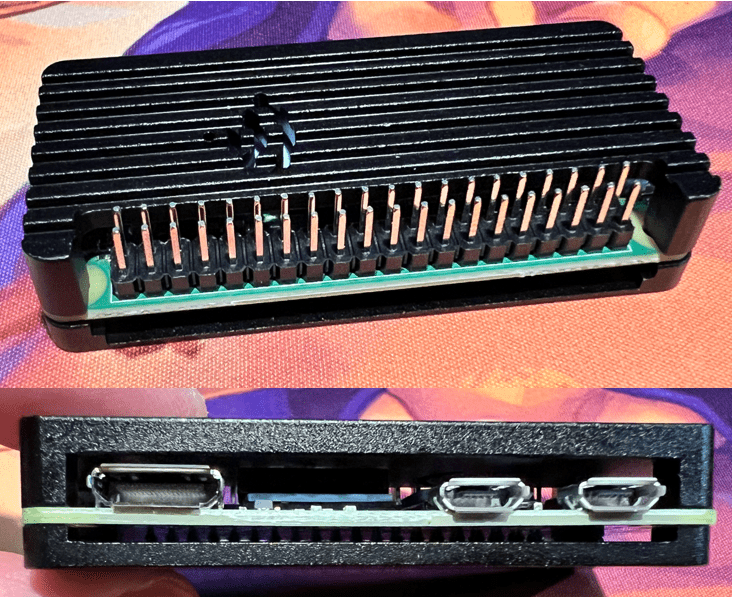
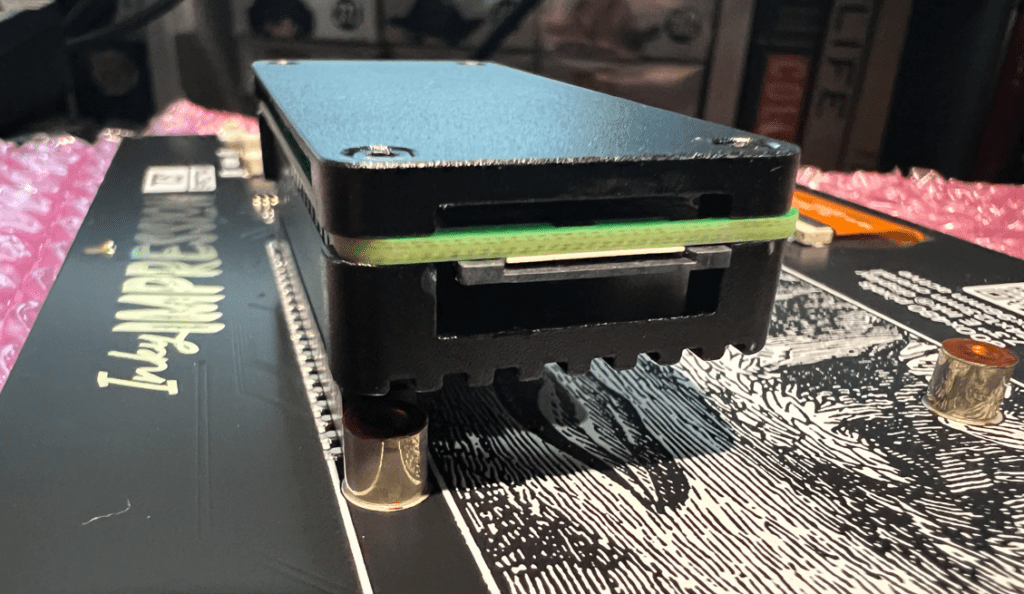
Here’s a top and side-view of the fully built Pi and case. You can see where the bump in the metal case is making contact with the thermal pad of the processor.
Check your pins on your GPIO and make sure none are bent or broken.
Step 4: Adding the Raspberry Pi OS to the Micro SD card
I’ve opt’d for the high endurance card because it’ll be on for a long time like a dashcam. I wanted something a little less brittle than a normal micro SD card, which aren’t made to be a hard drive. Honestly, this is why I’ve gone with Pi 5 and a hat for an SDD for other projects because the SSD was made to be accessed constantly.
I use uGreen’s multi-card reader (https://amzn.to/3PDfJrg) when adding things via PC like the Pi OS. I’ve noticed that I’ve been using USB-C more than USB-A, but this card reader gives me both options!
Download the imager directly from the Pi repository (find the Download for Windows button): https://www.raspberrypi.com/software/
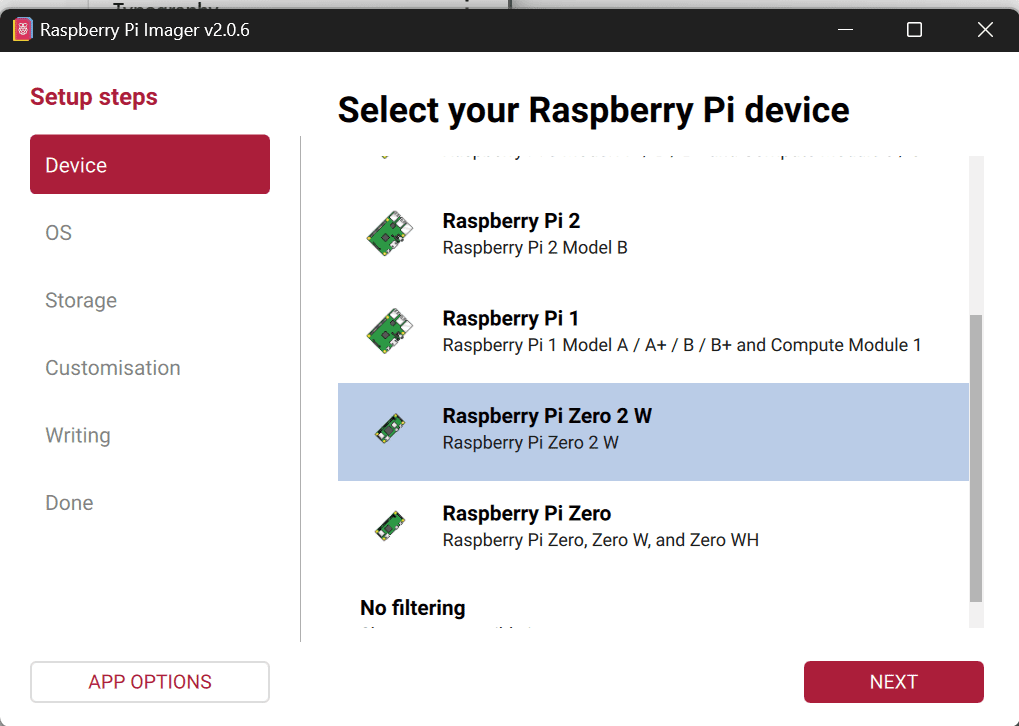
Yep, we want Raspberry Pi Zero 2 W (even though we have a WH) and that’s the OS version we want from the options.
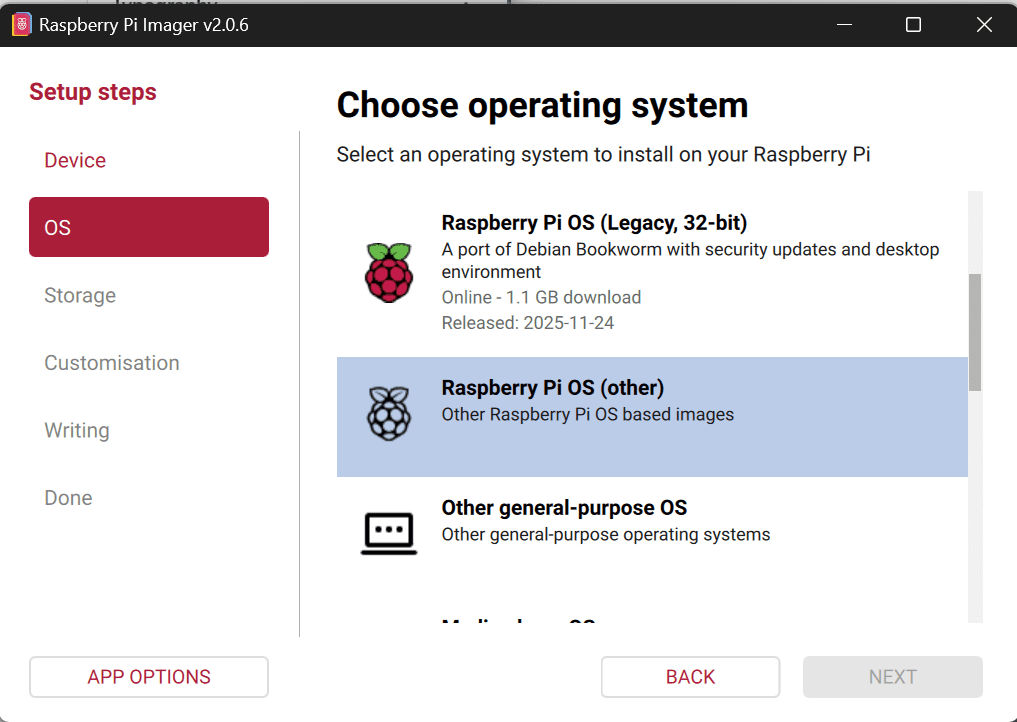
Select Other because we want 64-bit and not 32-bit and we don’t want other general-purpose OS or other distro of Linux.
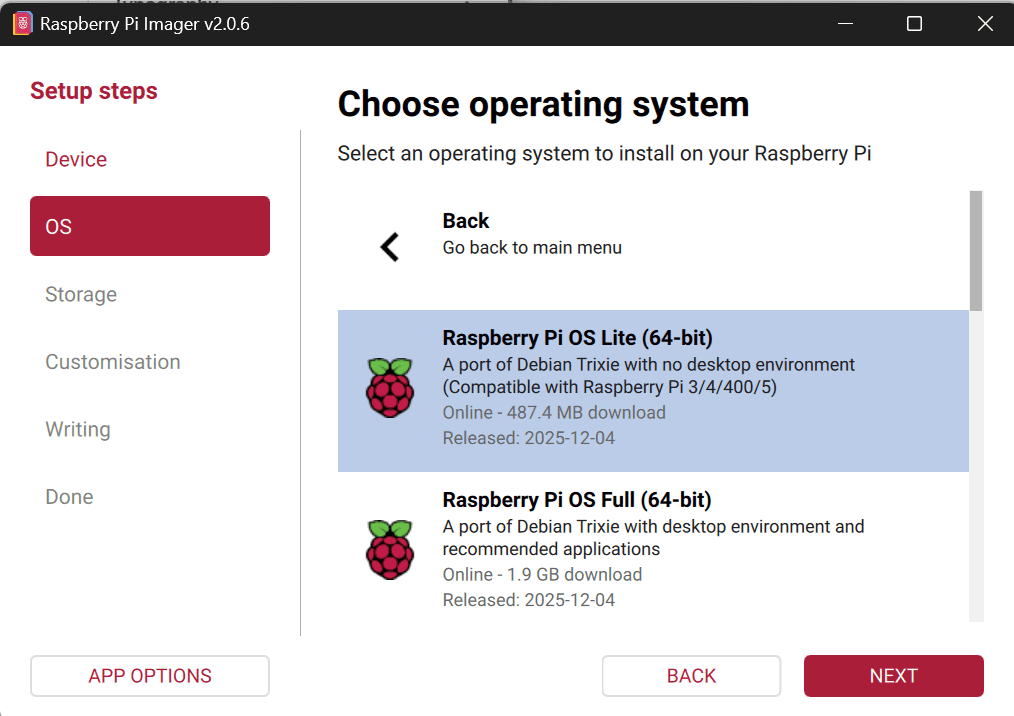
In Other, you can see Raspberry Pi OS Lite (64-bit), click Next after that.
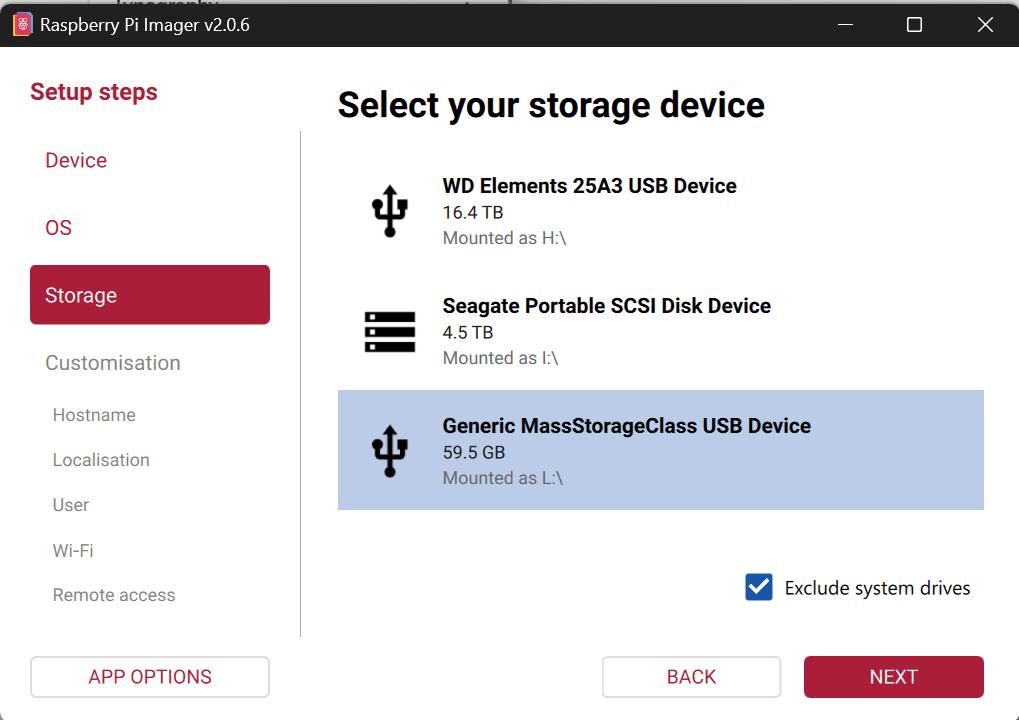
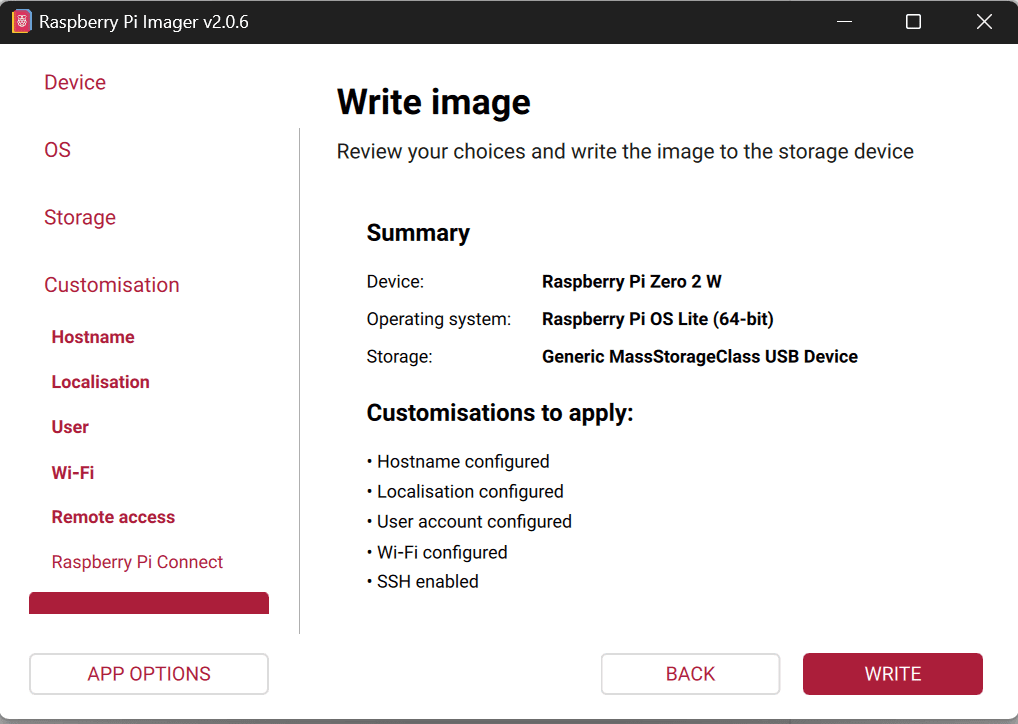
Then, make sure you select the right drive where your micro SD card is located. You can just open up your windows explorer and find the correct drive letter and select that one. Double-check this step because you don’t want to turn your PC unwittingly into a Pi OS desktop.
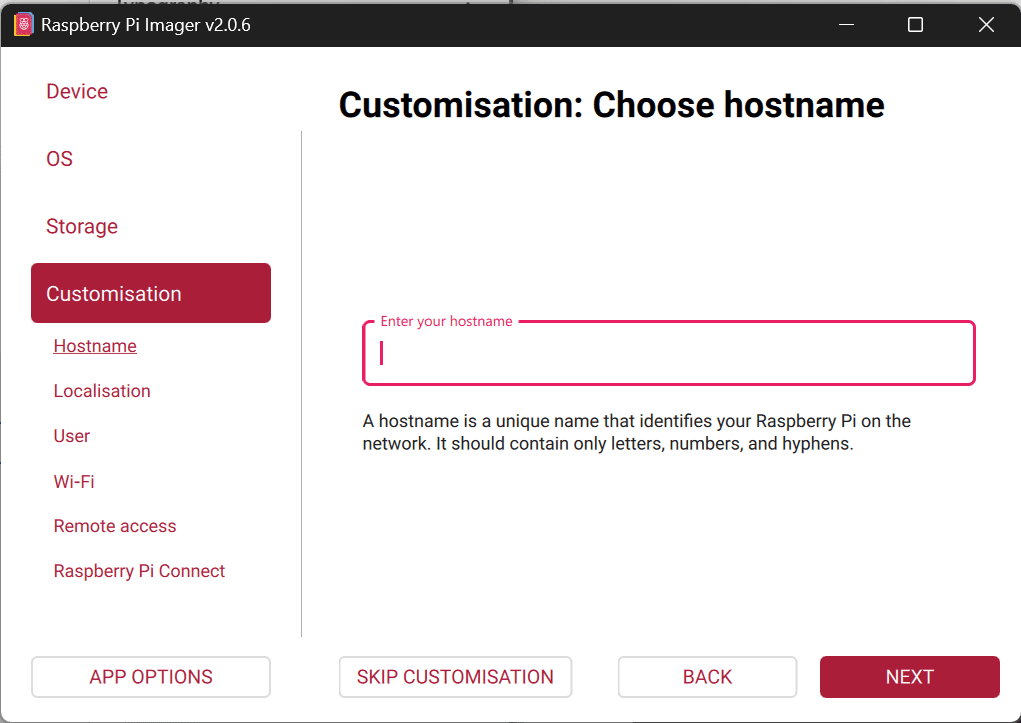
This is the Raspberry Pi’s PI-NAME and you must remember it for SSH-ing in and for some code below as well. Give it a good name! Also, remember it for the future because it’ll the second thing you type (“NAME@PI-NAME.local”) later.
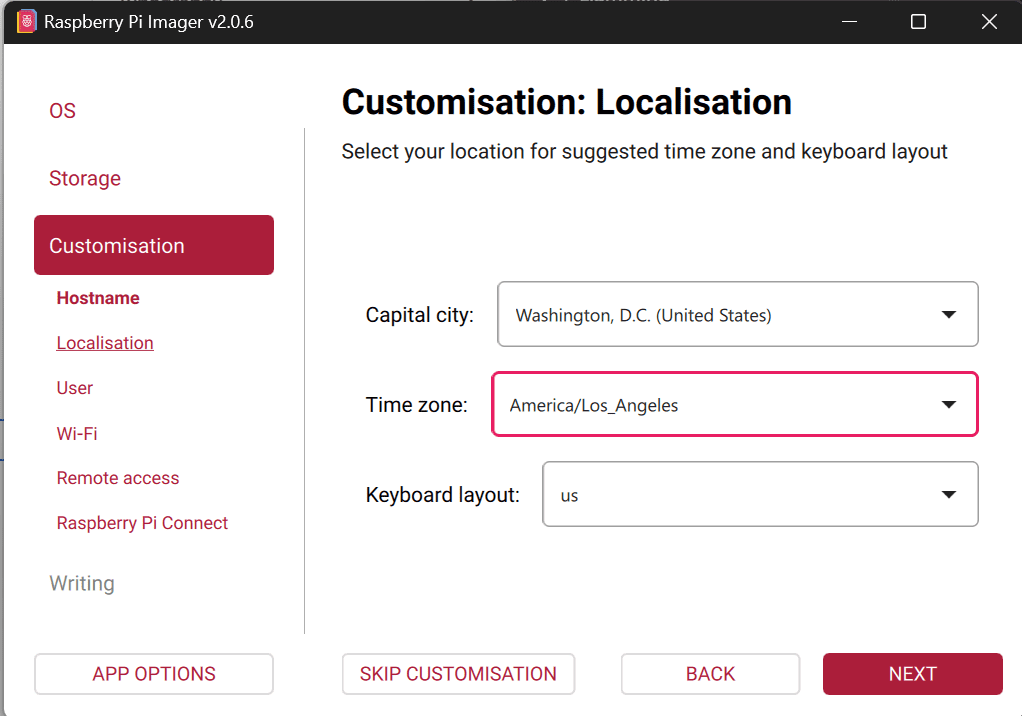
Select your country’s capital city and Time Zone. Then, the keyboard layout you use.
Add a username for the Pi and add your Wifi information in the Customization for WiFi next. Allow for remote access and then Write Image to the SD card. Remember, this will be the NAME in the “NAME@PI-NAME.local” when you call the Pi.
You’ll have to wait a bit for the download (depends on your net speed) and then the write to the micro SD card in the next step.
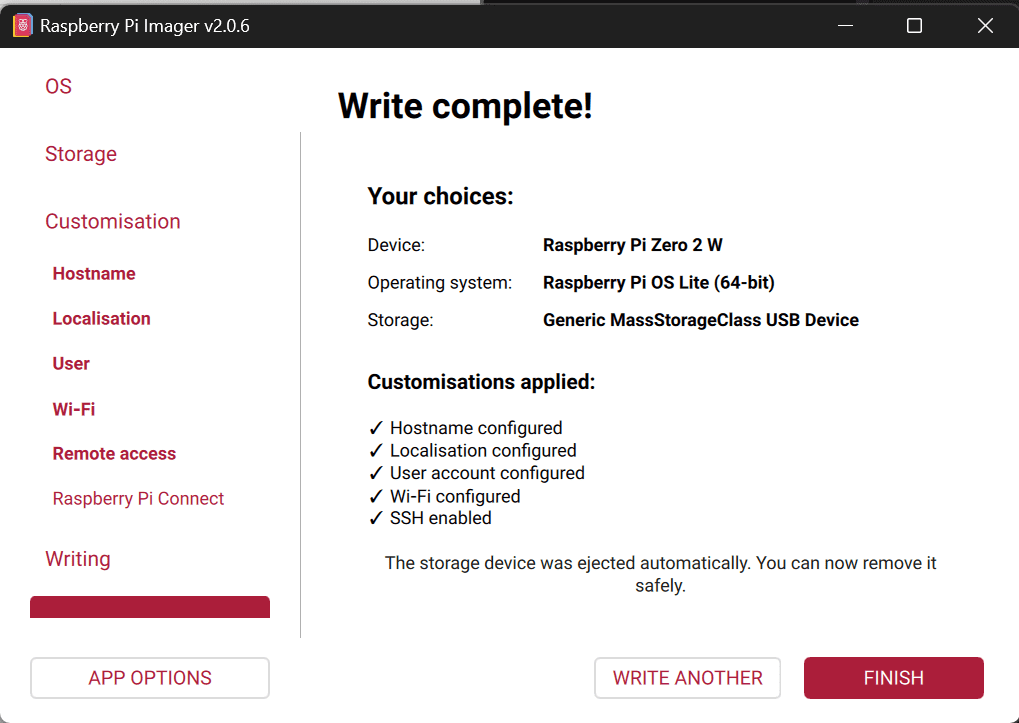
Once you get to the Write Complete! you can select Finish. Make sure the card reader and micro SD is ejected from your PC. Then, take the microSD card and power (furthest micro USB to the right). Put it into the Pi.
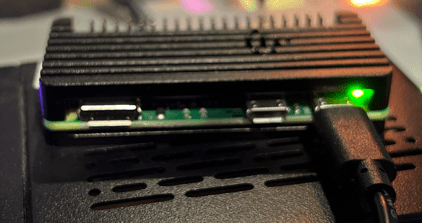
Step 5. First boot and getting into it via SSH
It’s exciting to boot the Pi for the first time. You can remember the old Frankenstein movies where the mad scientist (Dr. Frankenstein) shouting “It’s ALIVE! It’s ALIVE!”. Well, I do the same thing with my Pi builds to the dismay of my wife.
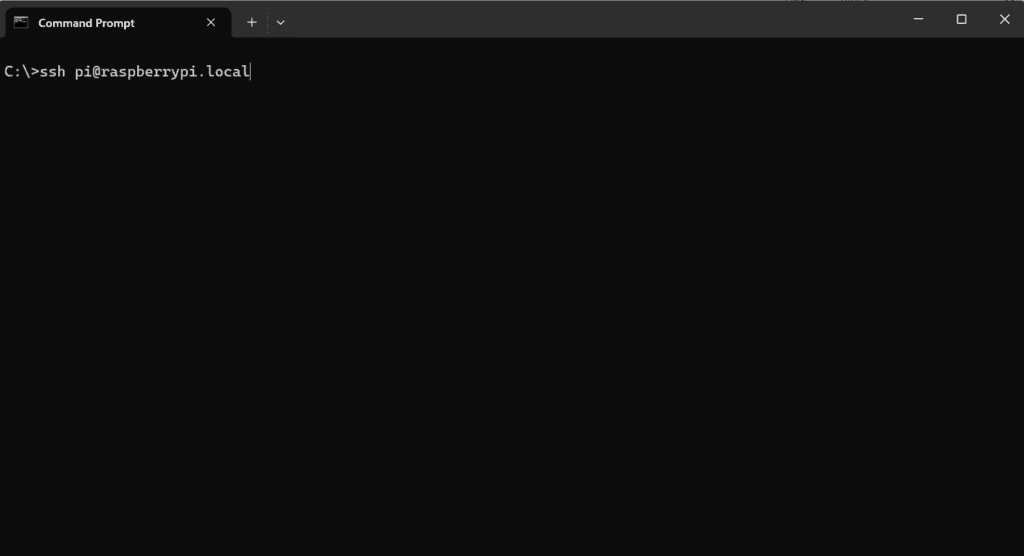
“pi” should be the NAME you designated in the setup and “raspberrypi” should be the name of the pi you’ve given it at setup. So, if your username is Calendar and the name of the Pi is MySmartCalendarPi then it would be “ssh Calendar@MySmartCalendarPi.local”
You’ll get a message with “The authenticity of the host…”, that’s normal and continue. It’ll add it to the list of known hosts and then you’ll be prompted for the password you added in the setup.
If you’ve logged in correct, you’ll see the text prompt change to green and some message about Debian GNU/Linux comes with ABSOLUTELY NO WARRANTY.
Update and install basics (all of the below are typed into the command prompt)
sudo apt update && sudo apt upgrade -yThen install Python and Google stuff (you may need something else if you opt for non-Google).
Python install and pip. You’ll need Python to run the scripts and PIP to install packages that Python needs to run things. For example, Python can draw graphs unless you install a package that includes graphing.
sudo apt install -y python3-full python3-venv python3-pip python3-pil gitNow with Pi, we should use VENV because of Pi OS
Create project folders needed:
mkdir ~/calendar
cd ~/calendar
(Optional) Create your icons
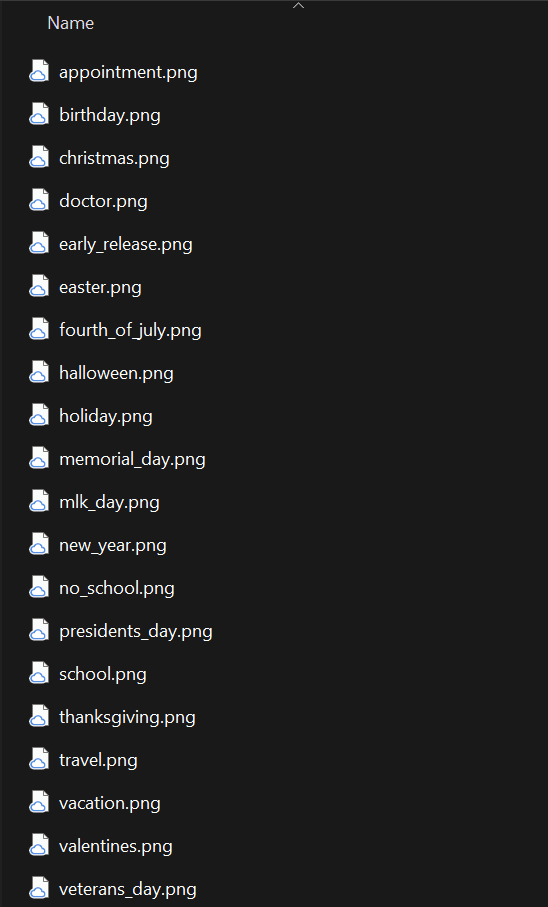
At this point, you may want to create your icons in your /icons/ folder that is near the rest of your files. They should be high contrast with clear outlines at 40×40 pixels. Also, keep in mind that the file names are case sensitive so you’ll have to name them exactly like below or else you’ll have to change them in calendar_display.py. Also, if you don’t want to do the icons, just make sure you have holiday.png because that is the fallback icon that will display for all events that doesn’t have a dedicated icon.
Check that your files in your PC are all together: calendar_display.py, credentials.json, and token.json in the main folder and all the icons are in the icons folder. You’re ready to move on to the next step of copying the files over from your PC to your Pi.
Open PowerShell (not the window you’re using with Pi).
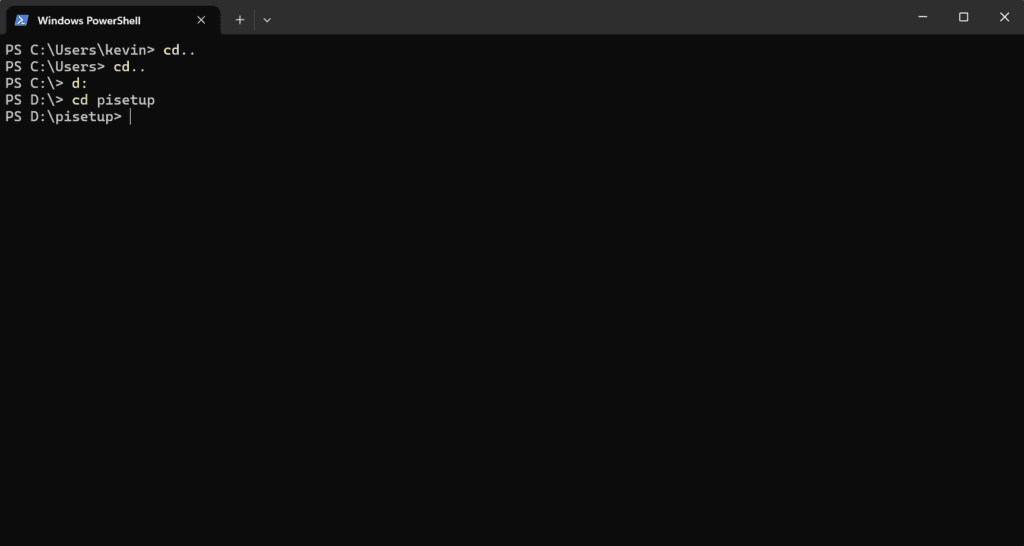
At this point, make sure your calendar files are in one place including the subfolder for icons and it’s PNG images. So, if your files are in your document subfolder called calendar then you should point it to “C:\Users\YourName\Document\calendar”. Mine is “D:\PiSetup” so I used that.
cd "C:\Users\YourName\Documents\calendar"It’ll ask you to log in again and the same error about authenticity but that’s fine. Continue.
You’ll see it copying the files over to your Pi and it’ll end back up in the command prompt. Now close this powershell and go back to your SSH one with you logged into Pi (green command prompt).
Then, run the calendar_display.py to start
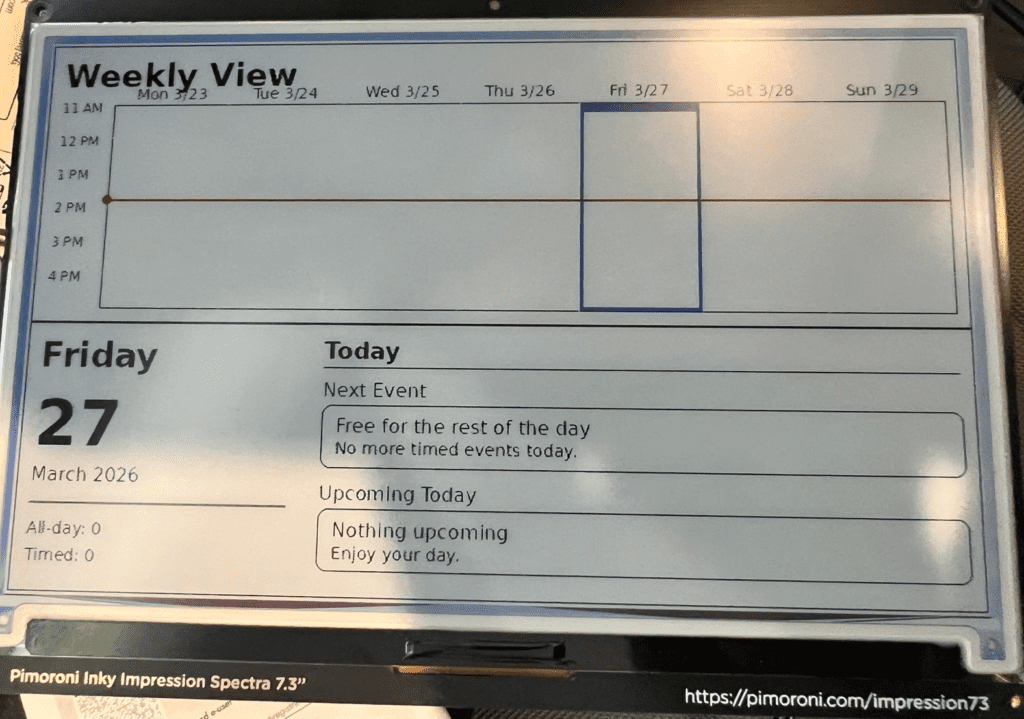
python calendar_display.pyIf you haven’t connected the monitor and changed to e-Ink display setting, then it’ll say “Saved preview to preview.png” if successfully ran. If you want to see if the calendar is rendering appropriately, you can open up another powershell and get the preview image to PC. Be sure to change the “pi@calendar-pi” to your names and the “D:\PiSetup\” to the location you want it to download in PC.
scp pi@calendar-pi.local:~/calendar/preview.png "D:\PiSetup\preview-from-pi.png"
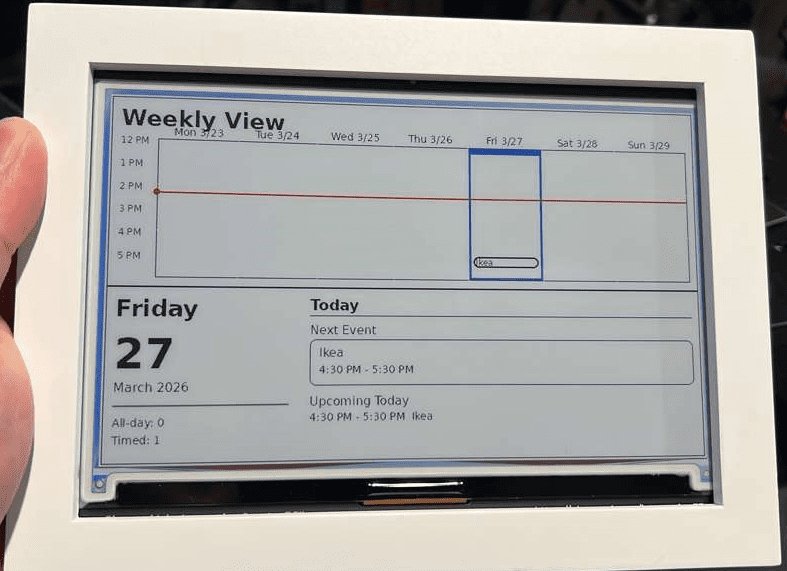
This will download the picture from Pi to your PC. It should be something like this:
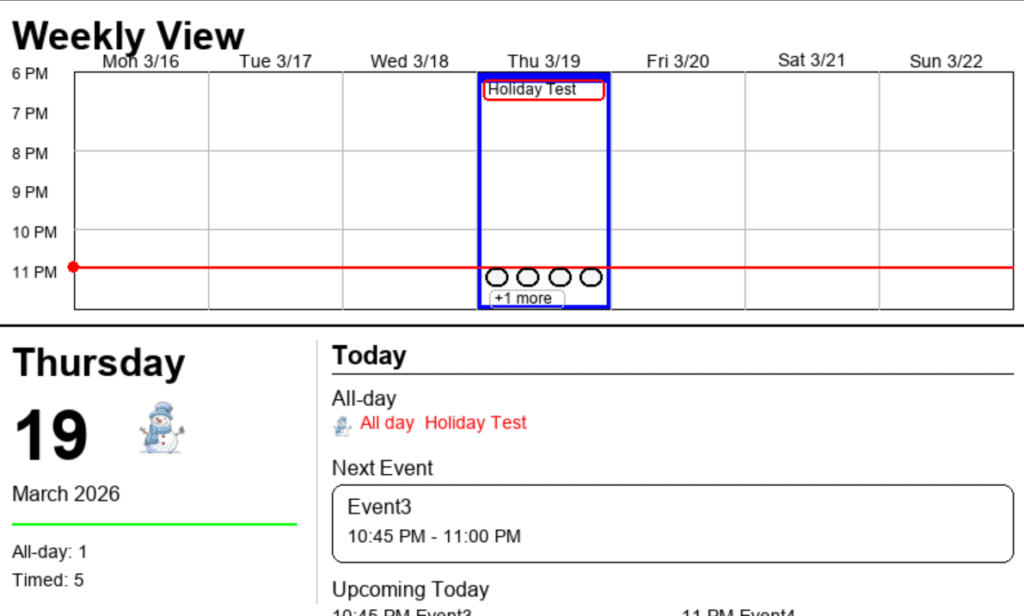
Just remember that it’s made to be displayed on the limited e-Ink display and not a 4k TV or something. We want readability and high contrast.
Congratulations. Test successful!
Let’s add one last thing to ensure smooth sailing. That we can output to the e-Ink screen as well as the HDMI one in case something happens.
sudo nano /boot/firmware/config.txtNow scroll to the bottom and add the following lines:
hdmi_force_hotplug=1
hdmi_group=2
hdmi_mode=82
dtoverlay=spi0-0cs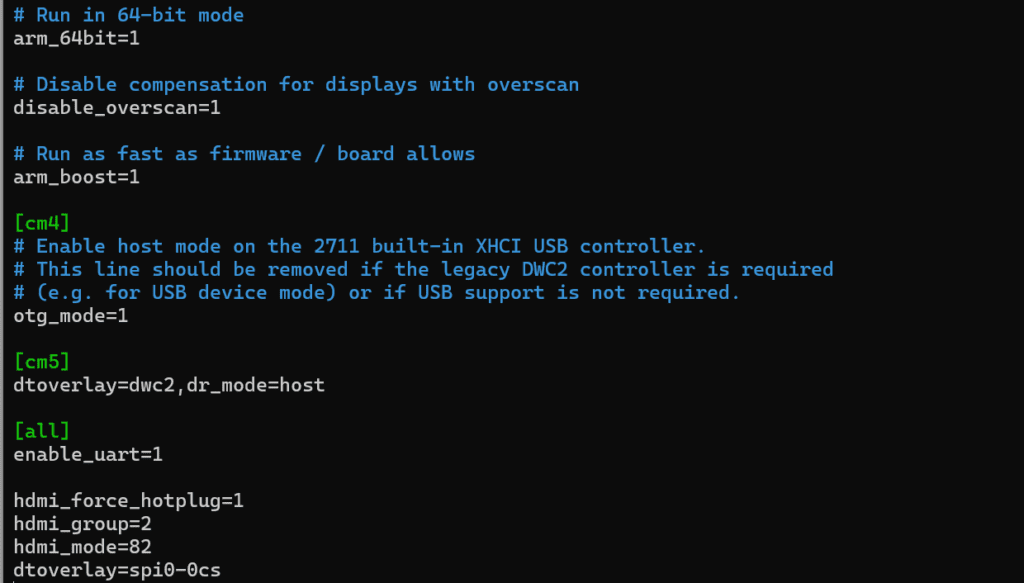
Reboot and SSH back in:
sudo rebootEnable both buses (hardware) to your Pi Zero 2
sudo raspi-config nonint do_i2c 0
sudo raspi-config nonint do_spi 0
sudo reboot
This usually take a while but if you tried to SSH and it says something about “Could not resolve hostname…”, then you might want to try this and find out where the pi is connected (it’ll be one in the list of ip addresses). Skip the code below if you can SSH in.
arp -aThen check if they exist.
ls /dev/spi*
ls /dev/i2c*
If not, you may need a mini HDMI to HDMI cable to connect to an external monitor.
After that exit and save with CTRL + X, Yes, and overwrite current. Shut down with:
sudo poweroffWait 30 seconds and unplug the power. You’re now ready to add the e-Ink hardware to the system.
Step 6. Connect the Pimoroni Inky Impression 7.3″ Screen
Mount the extension and then the Pi Zero 2 (buttons facing down) to the e-ink screen
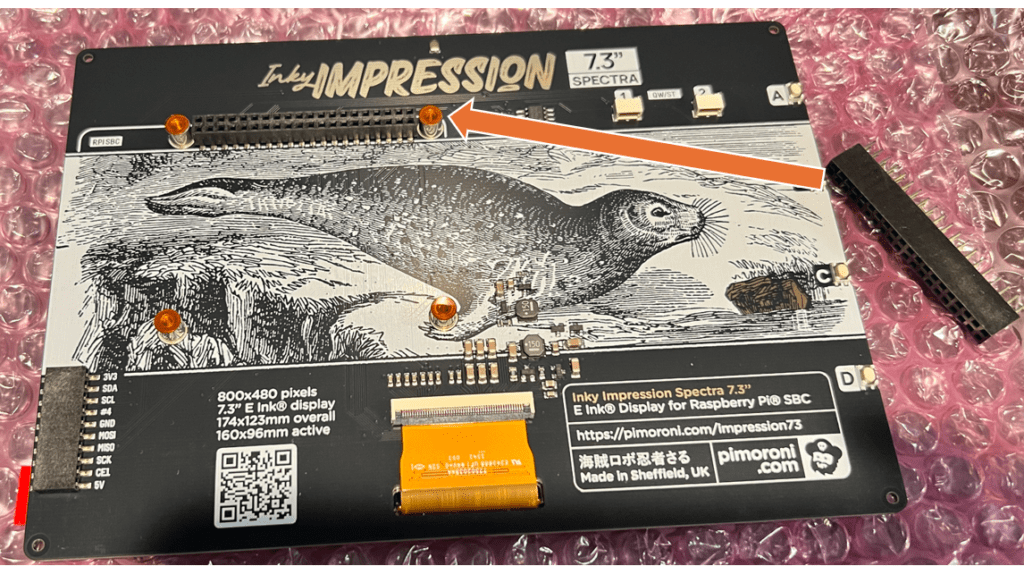
Make sure none of the pins are bent as you work forward. Add the extension to the screen carefully. Then, add the Pi to the extension with plugs facing down.
Now you’re ready to plug in the power and power it back on.
"ssh Calendar@MySmartCalendarPi.local"
Log back into your pi via SSH. “Calendar” is your Pi’s user name and “MySmartCalendarPi” is what you named the Pi earlier.
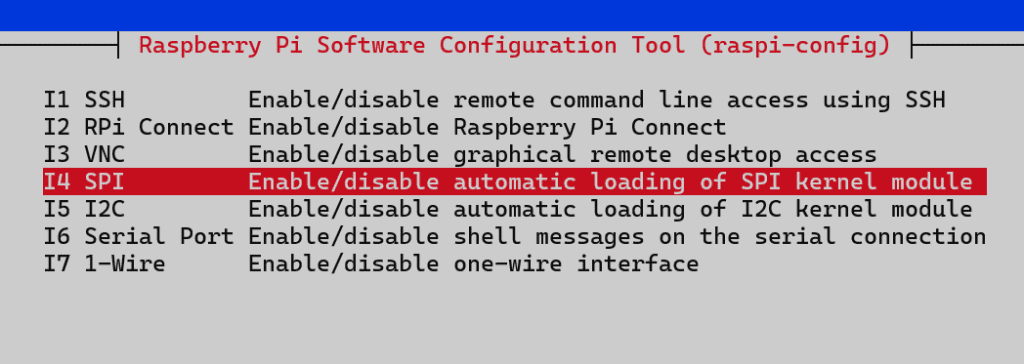
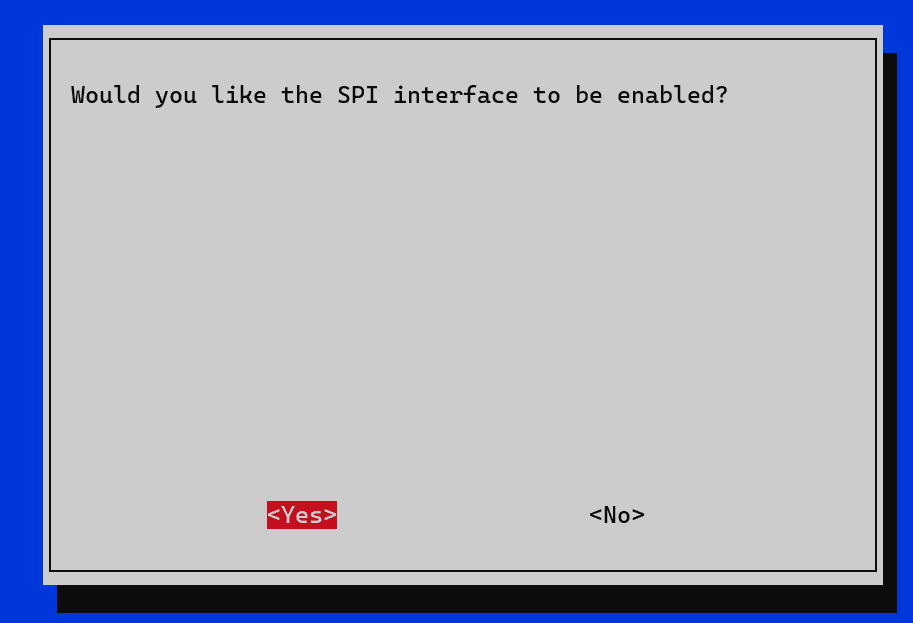
sudo raspi-configInterface Options -> SPI -> Enable
Finish and reboot via:
sudo rebootWait a minute or two and SSH back into your Pi
Install the Inky library and necessary files. You’ll need to create a virtual environment with a name Inky or so.
cd ~
git clone https://github.com/pimoroni/inky
cd inky
./install.sh
Yes to the example and the extensions in the install. Also, generate documents if you want. Then, reboot and re-SSH in:
sudo rebootThen activate the VENV:
source ~/.virtualenvs/pimoroni/bin/activateYou should be in (.venv) before you run “pip install inky”. This will take a few minutes depending on your internet connection.
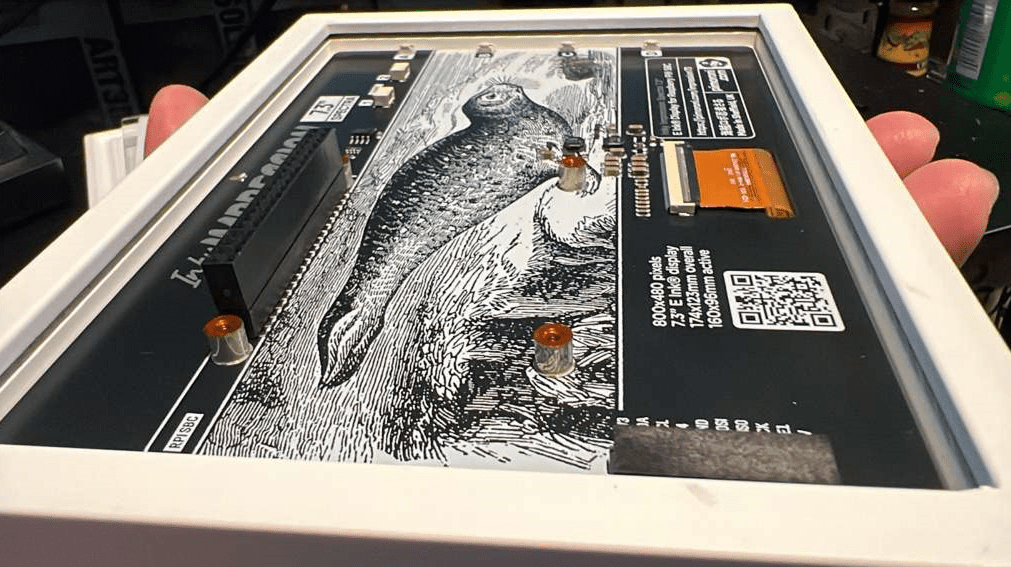
Activate the built-in Spectra 6 test
cd ~/Pimoroni/inky/examples/spectra6
python stripes.py
You should see the e-ink screen flash and change to bars of color. You should still be in (.VENV) of Pimoroni that looks like (pimoroni) before the command prompt.
Now let’s add in Google OAuth to the pimoroni environment:
pip install google-api-python-client google-auth-httplib2 google-auth-oauthlib pillowStep 7. Run the Calendar on the Inky Spectra 6
To be safe, let’s generate the token.json again since time my have passed and the token may not be accepted (and if any time that happens again, you can do this step).
Open up a PowerShell and use this SSH to get into it with port 8080. We’ll only need to get in this way when we need a new token.json.
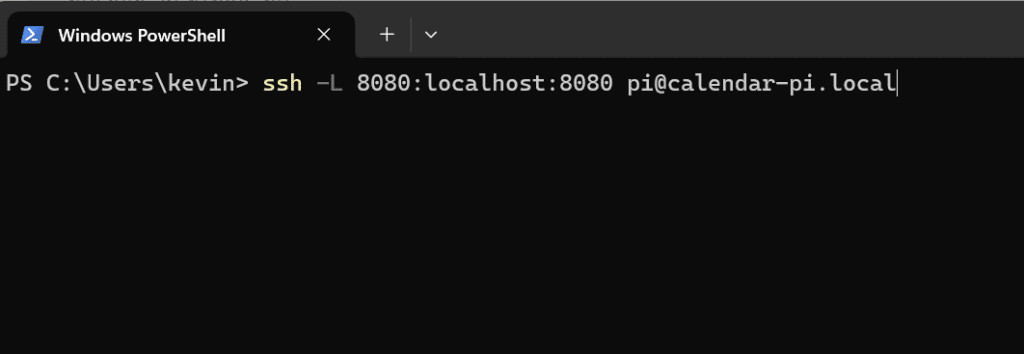
ssh -L 8080:localhost:8080 pi@calendar-pi.localJust remember to replace pi@calendar-pi.local with your names.
source ~/.virtualenvs/pimoroni/bin/activate
cd ~/calendar
python calendar_display.py
You’ll see a warning about visiting an http from Google to regen the token again. Copy the URL and in your PC’s browser with the Google account, access it.

As long as your preview PNG generates, ignore the weird tunnel error message.
Now let’s enable inky for startup.
Step 8. Enable Ink over other screens
Go into your calendar_display.py to edit one line:
nano ~/calendar/calendar_display.pyThen find the link “USE_INKY = False“ and change it to “USE_INKY = True“

Save and Exit (CTRL + X, then Yes, then save over it)
source ~/.virtualenvs/pimoroni/bin/activate
cd ~/calendar
python calendar_display.py
The screen should flash and update!
Step 8. Set the Pi to Update the Calendar every 20 minutes
We’ll need to edit the Pi’s Cron job setting.
crontab -e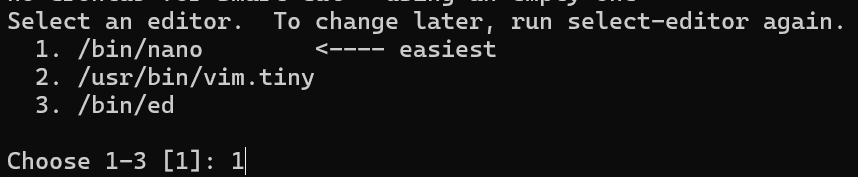
Then scroll down to the bottom and add the following lines (replace NAME with your Pi login name that you’ve made)
*/20 * * * * /home/NAME/calendar/run_calendar.sh >> /home/NAME/calendar/calendar.log 2>&1Save and exit (CTRL + X, Yes, overwrite). Then, activate it and set it.
crontab -lYou should see the edits you’ve just made. Now let’s check on a few things. Check to see if the calendar script is there:
ls ~/calendar/run_calendar.shIf not, then we need to create it with:
nano ~/calendar/run_calendar.shOnce inside the blank file, past the following (change NAME to the Pi user name you’ve chosen):
#!/bin/bash
cd /home/NAME/calendar
source /home/NAME/.virtualenvs/pimoroni/bin/activate
python calendar_display.py
Then, give it the right permission to run:
chmod +x ~/calendar/run_calendar.shOne last test. Let’s run the code manually (you can also add an event to the calendar to see if it works).
~/calendar/run_calendar.shOR
source ~/.virtualenvs/pimoroni/bin/activate
cd ~/calendar
python calendar_display.py
Once you confirms that work. Let’s put it to run on boot so that it can do it’s thing without our intervention.
crontab -eThen add this line ABOVE the one you’ve added before (of course, change NAME to the Pi name you’ve chosen):
@reboot sleep 30 && /home/NAME/calendar/run_calendar.sh >> /home/NAME/calendar/calendar.log 2>&1Save and Exit (CTRL + X, Yes, overwrite).
Now you’re ready to mount the Pi + e-Ink monitor to a frame and make it pretty.
Step 10. Putting the Smart Calendar in the Frame
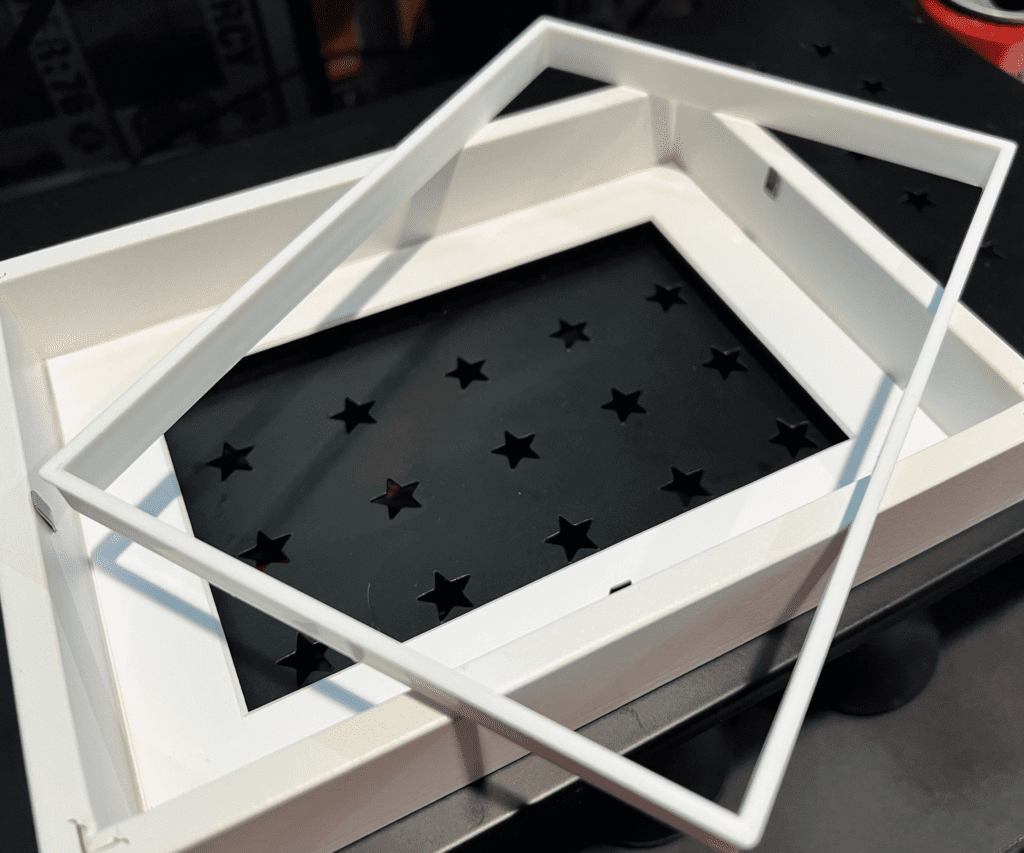
I wanted to go with a shadow box-ish frame for some added depth, but I couldn’t make it to Ikea yet. Instead, I wanted to try some of the Room Essential frames from Target since we were there anyway. I got two to test out and see if they could make the cut against a shadow box-ish style frame. Take a look below at the two test frames.

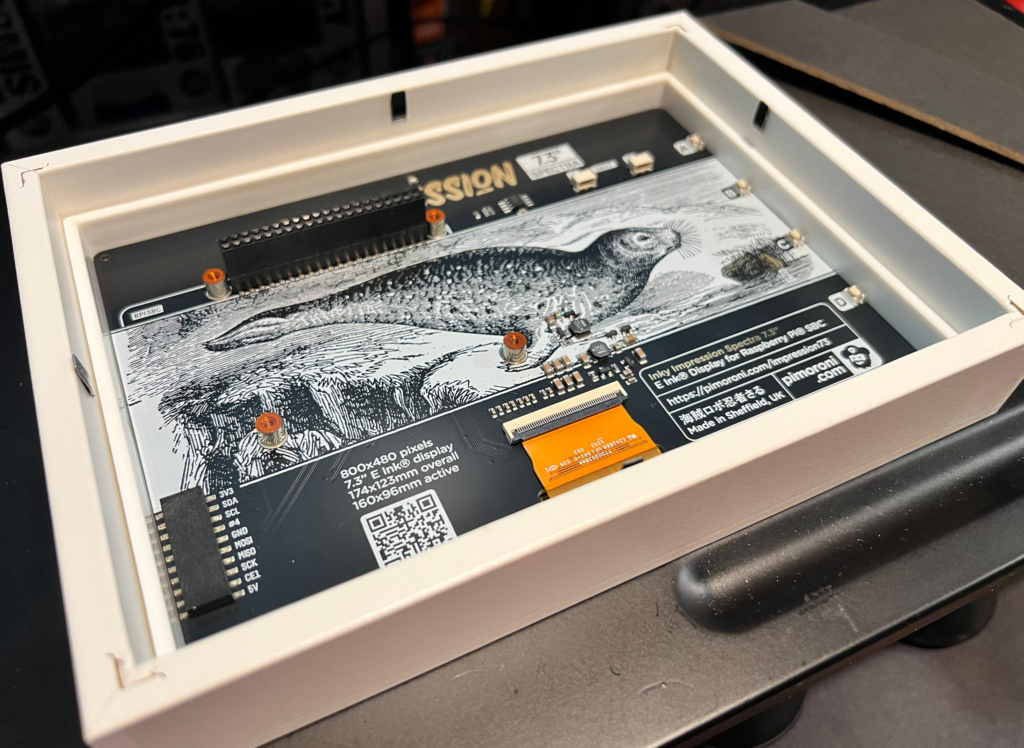
They’re both 5″ x 7″ but the depth is pretty shallow. The one on the right has a little more depth than the one on the left but not by much. Now, let’s try seating the e-Ink display into the frames. I took out the backing and the glass because our final product will be the e-Ink display flushed to the frame and then the backing with bumpers and a hole cut out a bit for the Pi sticking out. Think of it like one of those muscle car hoods with the engine outside the top of it (now imagine the Pi sticking out of the cardboard backing like that… No? … Maybe my imagination is getting the better of me).
At first, this looks great! The area around the screen isn’t obscured and only a little bit of the hardware is visible at the bottom. You can probably get away with trimming a very thin matte, but again, with the shallow depth, we can’t do that with this frame. In the next picture below, you can see why.
Alright, that’s how it looks like on the other side. There’s no pinching on the sides of the e-Ink monitor so that’s great. There’s enough room to add some scrapbook photo corners (something like this https://amzn.to/4s0Ixrm) if you wanted to but I think it can sit just fine.

In the picture above, you can really see why you need a shadow box-ish style frame. Now, imagine the Pi seated on top of that. You’re now at about double the depth of what the frame can offer. You don’t want it to stick out that much because mounting would be a nightmare. You want the frame to protect the screen and the Pi so that if I laid it down flat on the frame’s back, it’s not being held up by the Pi. That would cause an unequal force to be placed on that area of the screen, which is a no-no for the long run. And, before I get comments on this, no you cannot remove the extension with any case on the Pi because stand-off on the sides does not allow it. You may be able to mount a Pi 3, 4, or 5 to the standoff’s and forgo a case, but it would still be sticking out a bit beyond the frame.
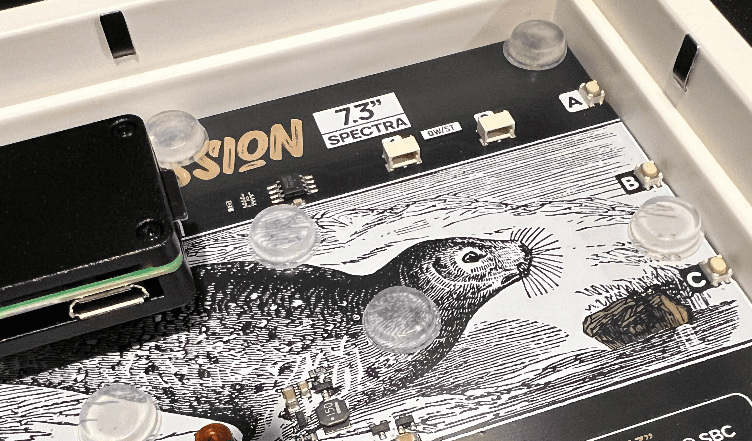
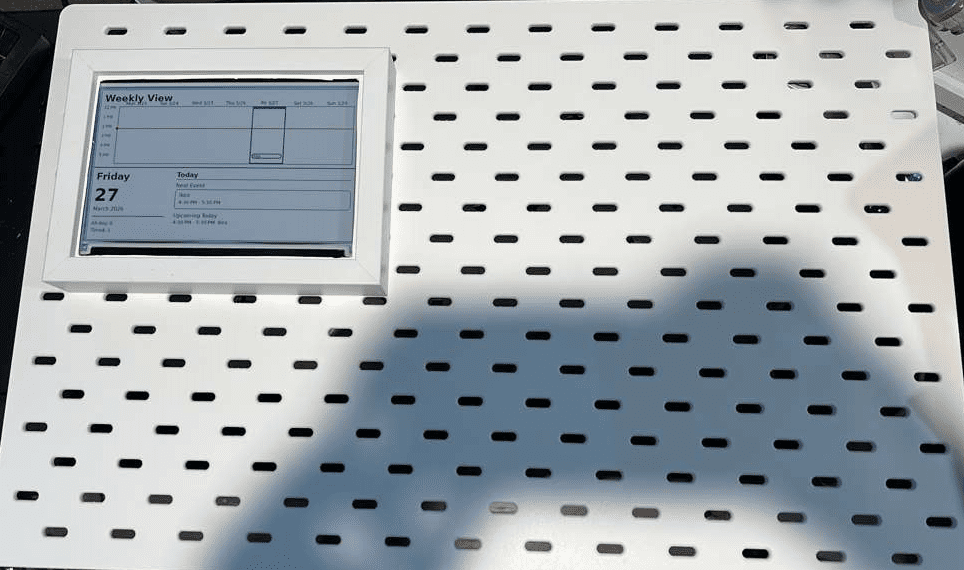
Here it is with the Ikea Rodalm White 5″x 7″ picture frame:
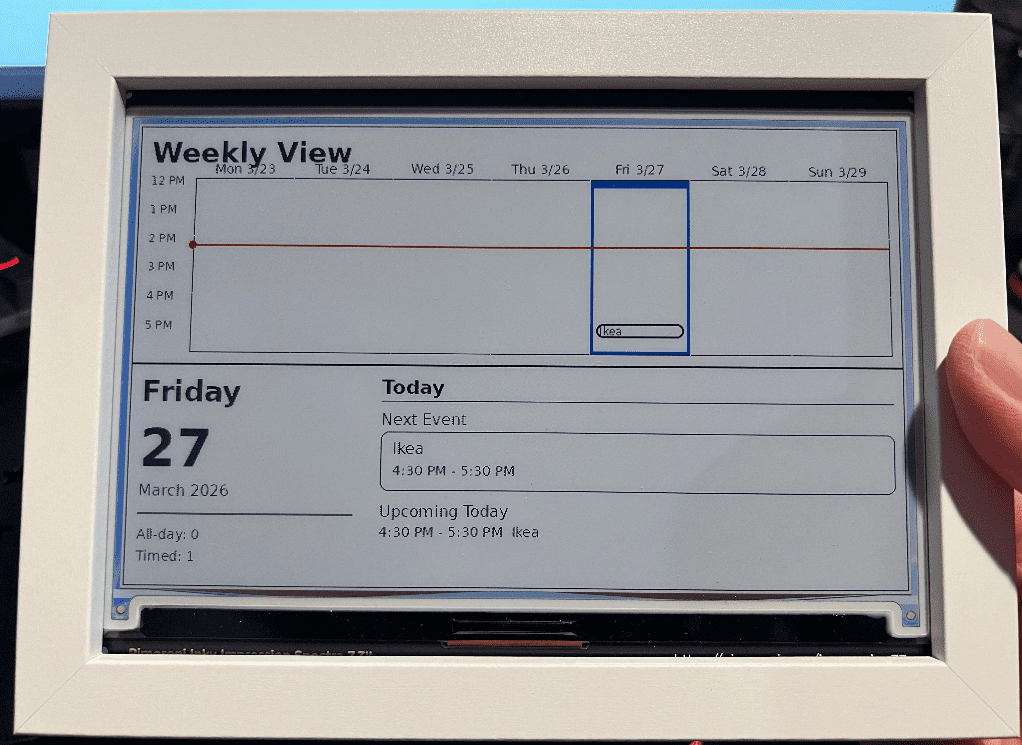
You can see that it fits perfectly like the other 5″ x 7″ picture frame but the magic is in the back. There’s enough room for the Pi and the back cover to ensure the frame is secured. Again, I also use clear bumpers to ensure equal distribution of pressure down on the monitor rather than at a single point that can break it.
You can also see that there is a plastic insert inside right before the from of the picture frame. This is actually helpful because the e-ink monitor sits perfectly in it while the backing sits on top of the plastic insert. You can see in the picture below how the plastic insert looks like when removed. I’m sure someone else can also use it creatively to make it a snug fit.
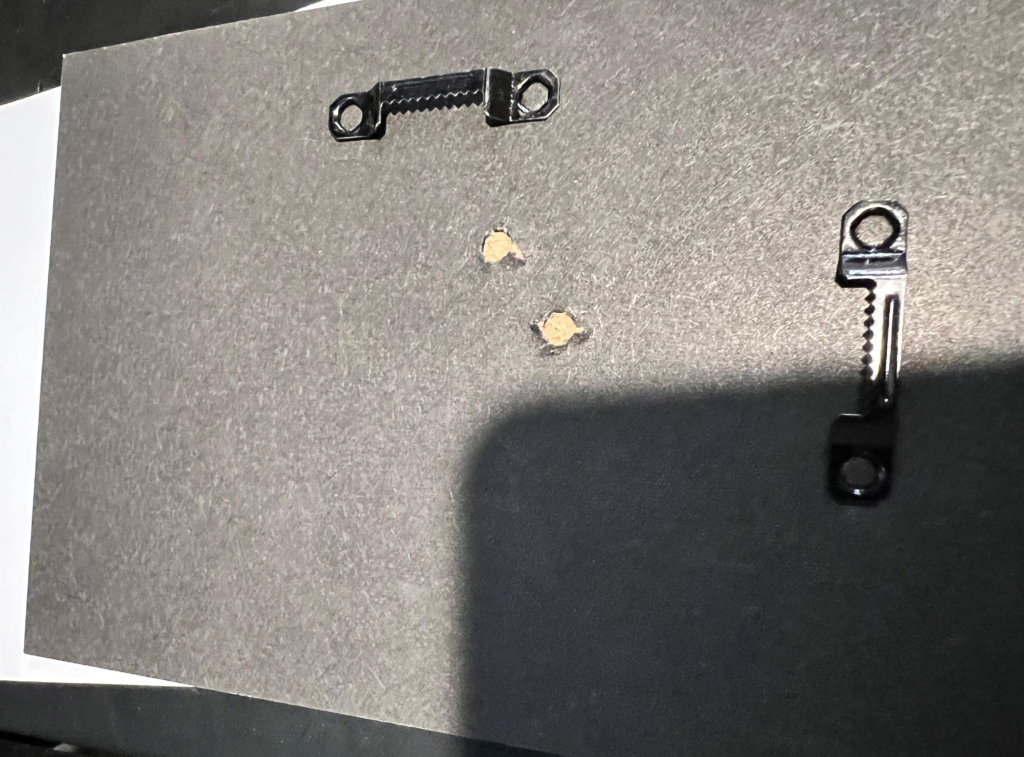
I’ve actually removed the easel backing from the frame because the hole would be over the mental hanger and I didn’t need that piece to be pushing against the pegboard. What I did was flip the cardboard backing and inserted it. You can also tape over the metal hanger pieces before you do that.
I didn’t wanted to free-hand cut the hole so I used the paper insert that came with the frame and traced over the area where the Pi would be. Just be careful when you use an Exact-o knife, cardboard cutter, or precision hobby knife. Especially when you’re a parent and lack sleep. That extra coffee or espresso shot may keep you awake for this but your handling may be a bit off. You may even want to get a knife safe gloves to help you out. Safety first!

I’m sure you all can get a better trace and cut in, but you get the idea. After, I overlayed it on the cardboard back and traced it into it. I then used the Amazon Basic Precision Hobby Knife to cut out the shape from the cardboard backing. Please keep in mind that this can be dusty as you do this, so you might want to prep your work area for it. Place your bumpers before putting on the cardboard backing. Again, this helps equally distribute weight if anything presses on the board.
Here is how it looks like with the traced hole cut out in the cardboard backing. I laid it down and then secured it again. The Pi is sticking out enough to be cooled but enough to stick out of the frame’s depth. I can place it on the desk and the Pi wouldn’t touch the desk at all.

Lastly, you might want to fit a few wire clips organizers like the ones I’ve indicated in the optional list.
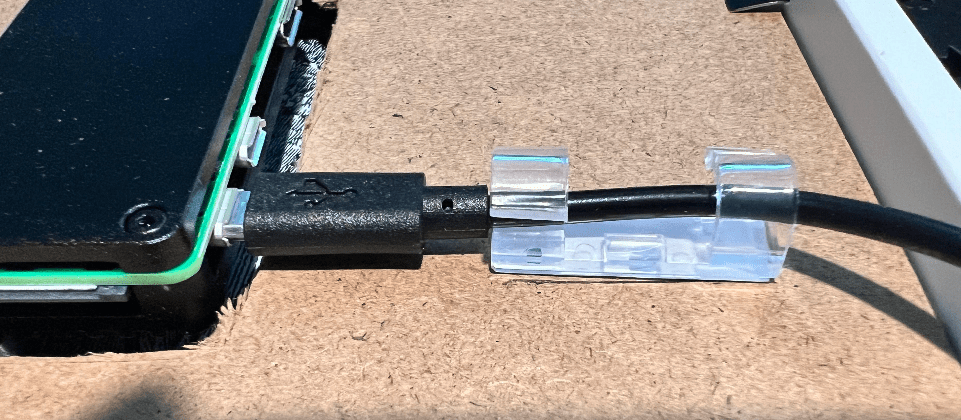
This will ensure that the Pi’s micro USB port doesn’t get damaged if the wire gets moved a bit while on the pegboard. I’m sure that if you’re patient enough, you can also cut a notch on the bottom for the wire to lay flush with the frame. While you’re at it, cut a vent hole on the top to allow heat to dissipated off and maybe even one below the Pi to allow air to circulate up.
You can see that the Smart Calendar will only take about a 1/4 of the small Ikea Peg Board so it could be centered, flushed left or right depending upon where you’ll be mounting the board. The switch can be mounted to the front of the board for easy access and the rest can be wired to the back of the board to be zip-tied and organized. My outlet is really far and around the corner from the wall that I’m mounting it on so I’ve opt for the long extension cord with USB power as well, that can power another project in the future. You can also opt to just mount the Smart Calendar to the wall. I know you can see my half-awake, sloppy cuts on the matte but forgive me because I did after a long day watching the little one.
References and Sources
- Learn Pimoroni: https://learn.pimoroni.com/article/getting-started-with-inky-impression
- Raspberry Pi Zero 2 W documentation: https://www.raspberrypi.com/products/raspberry-pi-zero-2-w/
- Raspberry Pi OS repository: https://www.raspberrypi.com/software/